How to Change IP Address on iPhone: Simple and Secure Methods Explained
When you change your iPhone IP address, your connection becomes more private and secure. This way, you prevent third parties, from hackers and snoopers to your Internet service provider (ISP), from monitoring your online activities. What’s more, this trick will allow you to overcome geographical limitations and access blocked websites when traveling. There are a couple of effective ways to change your IP address on iPhone. Read along to discover those methods and pick the most suitable one for your situation.

How to change your IP address on iPhone with a VPN: A quick guide
Are you in a hurry? Then check out our quick guide on how to change IP address on iPhone to another country in 5 simple steps.
- Choose a reliable VPN service provider like VeePN. It provides access to a wide selection of virtual locations worldwide, as well as additional security features and strong data encryption.
- Select your preferred pricing plan and subscribe to VeePN.
- Download and install the VeePN app for iOS on your iPhone.
- Open the app and connect to the most suitable location.
- Turn VeePN on. Once you do, your IP address will change.
Now, let’s explore the best ways to change IP address on iPhone in detail.
3 easy ways to change IP address on iPhone
Here are the most straightforward and effective methods that will help you change your IP address on an iPhone.
Method 1: Use a VPN to change your iPhone location
If you need to hide IP address on iPhone (or any other device), a VPN is your best bet. It gives you an alternative address associated with the chosen virtual location that is visible to third parties, while the real one remains hidden. It lets you browse the web as if you were somewhere else – for example, if you’re in the US and connect to a VPN server in Bogota, your IP address will show up as being located in Colombia.
On top of that, a VPN is a powerful cybersecurity tool that protects your personal information by encrypting your Internet traffic. It also prevents you from various online risks, such as public Wi-Fi threats, hacking attempts, malware, and private data leaks.
But keep in mind that not all VPN services are equally safe and efficient. The ones promoting themselves as “free” often neglect customer privacy and may put your data at risk (we will explain how to pick a trustworthy service and reveal how to use VPN to change location on iPhone in a bit).
Method 2: Change iPhone location with a proxy server
If you want to change your iPhone IP address without compromising your connection speed, another possible solution is to use a proxy server. When you connect to it, your Internet traffic will move through a remote location in a chosen country. A proxy will provide you with an alternative IP associated with this location, which makes it a decent option to overcome geoblocking and access the content of your choice.
But proxies also come with significant downsides. In particular, they don’t encrypt your traffic, meaning that your Internet activities won’t be protected from third-party monitoring and various security challenges, from hacks to distributed denial-of-service (DDoS) attacks. Also, beware of “free” proxies – those usually come with tons of intrusive ads and may even sell your private data to advertisers.
In our related blog post, you can learn more about the difference between a VPN and a proxy server.
Method 3: Using Tor for anonymizing your iPhone location
Tor is a free solution for anonymous browsing run by a group of international volunteers. This solution was designed to overcome Internet censorship and access the wildest corners of the Internet known as the dark web.
Apart from changing your actual IP, Tor runs your Internet traffic through several nodes (the process is also known as onion routing), allowing you to communicate with other Internet users and browse the web without exposing your real identity. But it doesn’t let you choose your virtual location, which limits your browsing freedom and is incredibly slow compared to VPNs and proxies. You can learn more from our blog post explaining how Tor differs from a VPN.
Also, it’s important to note that there’s no official version of Tor for iOS. Instead, you can only run the alternative solution – Onion Browser.
VPN vs. proxy vs. Tor: The round-up
Now, let’s compare the key features of IP-spoofing tools to decide which one works best for your needs.
| VPN | Proxy | Tor | |
| Change location on iPhone | ✅ | ✅ | ✅ |
| Unblock websites | ✅ | ✅ | ✅ |
| Strengthen privacy and security | ✅ | ❌ | ✅ |
| Encrypt Internet traffic | ✅ | ❌ | ✅ |
| Bypass geo-blocks | ✅ | ❌ | ❌ |
| Prevent third-party tracking | ✅ | ❌ | ✅ |
| Stop Internet throttling | ✅ | ❌ | ❌ |
| Avoid connection drops | ✅ | ✅ | ❌ |
Now you’re familiar with the key methods to change IP on iPhone. But you may also wonder whether it’s possible to find the IP on your device and change it manually. Here are some details.
How to find IP address on iPhone
Finding your public IP address (the one that is visible to online services and websites you’re using, as well as your ISP and other third parties) is easy. Just enter the “What is my IP?” section on the VeePN website – it will show your current IP address and the location associated with it. Again, you can change your iPhone location and hide this information by connecting to a VPN server.
In turn, your private IP address (also known as the default gateway of your device) can be found and changed manually in your iPhone settings:
- Open Settings > Wi-Fi.

- Tap the info icon next to your network’s name.

- Look for IP Address in the IPV4 Address section. The number displayed there is your iPhone’s private IP. Also, you can configure IPV4 and reset iPhone IP manually whenever you want.

How to reset IP address on iPhone manually
To reset iPhone IP address, follow these simple instructions:
- Head to Settings and open Wi-Fi.
- Tap the info icon near the name of your Wi-Fi network.
- Find the IP Address section and select Configure IP.

- Choose between Manual and Automatic options. If you opt for manual configuration, you will have to enter your new IP address, as well as your subnet mask and router address.

Changing your IP address on an iPhone is quite easy, especially if you’re using an intuitive VPN application. But is it really worth it? Let’s take a closer look at the main reasons to change your iPhone’s IP.
Why do you need to change IP on iPhone with a VPN?
Here’s why it’s beneficial to change VPN location on iPhone:
- Protect your privacy. Apps and websites are always trying to find out your private information to target you with ads. But, with your IP and location spoofed, they can’t get their hands on that data. This helps keep your online privacy and security.
- Access content. VPN’s ability to unblock websites and access the Internet freely is key for people who live in places with government censorship or those who travel often. But faking your IP address gives you access to many services from all over the world, which is especially helpful for streaming. That’s why different server locations in many countries are a must for a good VPN provider.
- Secure yourself on public Wi-Fi. Can public Wi-Fi be a lifesaver? Certainly. Is it safe? Not at all. Since open networks are often unprotected, they likely have many bad actors snooping around. If you do need to hop on public Wi-Fi, get your VPN up and running. It will hide your real IP and prevent your sensitive data from leaks.
- Shop for cheaper prices. Sometimes, the prices you see online depend on where you are in the world. This is called geographical pricing. For example, the prices tend to be higher in more affluent countries. So when traveling, you may find that things like flights or hotels are more expensive than in your home country. Changing your IP to the preferred location will allow you to shop online as if you were still at home.
- Stop Internet throttling. Your IPS may slow down your Internet speed for no fair reason, applying a technique known as Internet throttling. It often spoils the fun of streaming and gaming fans. Luckily, when you change your IP with the help of a VPN, ISPs don’t know what you’re up to online. So, they will have no reason to throttle you.
To gain all the benefits listed above, you need a powerful and trustworthy VPN for iPhone. Here’s how to pick the perfect option for your needs.
How to choose the best VPN to change IP address on iPhone
A reliable VPN app for your iPhone should cover the following aspects:
- Plenty of server locations around the world. Choose a VPN that offers an extensive network of remote servers. This both enhances your browsing freedom and ensures a stable connection for any online activities.
- AES-256 encryption for the best data protection. Premium VPNs support AES-256 – the strongest encryption standard to date, letting you surf the web with peace of mind.
- No data or speed caps. Any VPN will reduce your Internet speed to some extent. But with a reputable service provider like VeePN, this slowdown won’t be noticeable thanks to WireGuard® – the fastest VPN protocol out there.
- Easy-to-use app. Make sure the chosen VPN is as intuitive and smooth as possible. It should allow you to change your IP in a few simple clicks.
- Additional security features. A good VPN comes with a bunch of essential cybersecurity features. These include Double VPN, Kill Switch, and DNS and IP leak protection.
- 24/7 customer support. Prioritize VPNs with responsive and versatile customer support. As a rule, 24/7 live chat and email help are available.
- Flexible and affordable pricing. Finally, ensure your VPN comes at a reasonable price and offers a couple of subscription options to choose from.
VeePN is an Apple-approved VPN app that ticks all the boxes above. It provides servers in 89 locations around the world and protects your data with top-grade encryption. And its NetGuard feature will make your experience even better by stopping annoying pop-up ads, trackers, and malicious websites. This is all packed in a simple easy-to-navigate app which you can try risk-free right now.

Pro tip: Check out our article for a detailed guide on how to set up a VPN on an iPhone.
How to hide IP address on iPhone with VeePN: A detailed guide
Here’s your step-by-step guide on how to change VPN location on iPhone to another country with VeePN.
1. Create a VeePN account and sign in
After installing the VPN on your iPhone from the App Store, you can create an account and log in to set it up. This will help with verifying who you are, and will also let you use the same VPN settings on other devices with the same app.
VeePN offers a free trial when you sign up, so you don’t have to pay for a subscription just to get started.
2. Create VPN configurations
For the VPN app to run on your iPhone, it needs permission to change some of your phone’s settings and turn on its own encryption. If your iPhone asks if it’s okay to make these changes, tap Allow.
3. Pick the country you want to connect to
Now comes the interesting part. A VPN lets you pick which server location you want to connect to and access your favorite content even when you’re in a different country. You can also switch between different server locations to check out content that’s only available in certain places. But just remember that some content providers might not like this.
Disclaimer: VeePN does not promote, condone, or encourage using a VPN in ways that would potentially violate Terms of Service of other companies. For more details, please read the VeePN Terms of Service.
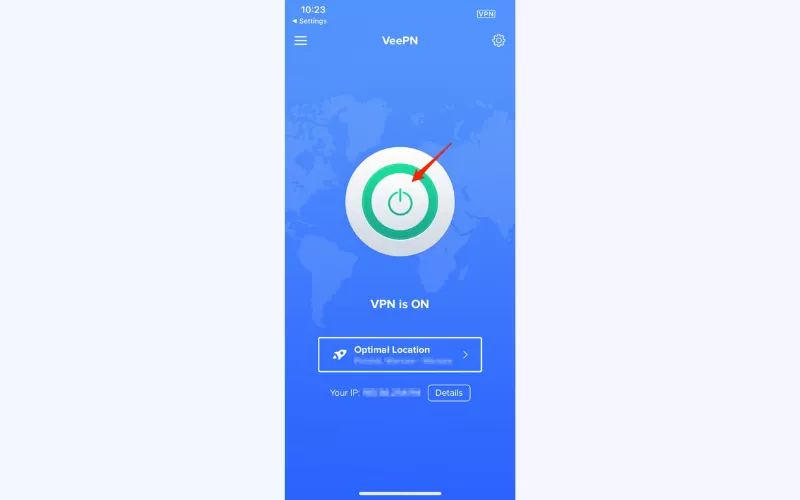
You can choose among many server locations with VeePN. Tap the location selection under the Connect button and choose your fighter:
- Optimal Location connects you to the nearest server, thus giving you better speeds. Choose it when you just want to boost your online privacy by hiding your IP address.
- Pick a server in a specific country when you want your IP to be associated with a specific location.
- Go for Double VPN servers when you need extra protection for your data. But for private everyday browsing, a regular VPN connection will do.

4. Click “Connect” to turn the VPN on
Once you pick a VPN server, turn on a VPN connection by tapping the Connect button on the main screen. This sends all your Internet traffic through that server and hides your real IP address and location. So, it looks like you’re actually in the same place as the VPN server.

5. Check if your VPN works
If you want to make sure your VPN is actually working, look up your IP address. First, find out your original IP address — you can just Google “What’s my IP?” Then, connect to a VPN server to check your IP address again and see if your location changed. If it’s different now, your VPN is working.

If your location remains the same, that means something is off and you may want to troubleshoot your VPN connection.
FAQ
Yes, similar to any other device, your iPhone has a public IP address (default gateway) and a private IP address. While the private IP can be found in your phone’s settings and changed manually, your public IP remains visible to your Internet provider, as well as the websites and apps you’re using.
Your iPhone’s IP address is a unique set of numbers that identifies your device when it’s connected to the Internet. It exposes some data about your connection, including your current location.Learn more in this guide.
Yes, here are several simple methods to change IP address on your iPhone:
- Use a VPN
- Use a proxy server
- Renew the lease in your phone’s settings
A VPN is the most reliable and effective way to change your IP and virtual location on an iPhone. Check out this article to learn more.
To change your iPhone IP address and location, follow these steps:
- Choose a reputable VPN service provider like VeePN.
- Select the most suitable pricing plan and sign up.
- Download and install VeePN on your iPhone.
- Open the app and connect to the preferred location.
- Tap the Connect button to turn the VPN on.
A VPN is the best way to hide your IP and other private information on your iPhone. It doesn’t only provide you with an anonymous IP address, but also covers your entire Internet traffic with reliable encryption. It means that no one, including hackers, your ISP, or the government, can spy on you. Read this article for more info.
Yes, you can use a VPN to change your iPhone location and access certain content that is unavailable in your current location. For example, when traveling to another country or region, you may want to play your favorite games or watch the desired TV shows. However, that content often appears to be blocked due to local distribution or copyright agreements. The most effective solution is a reliable VPN for iOS like VeePN. It will help you switch your iPhone IP address and browse the web as if you were still at home. Feel free to check out this blog post for more info.
VeePN is freedom
Download VeePN Client for All Platforms
Enjoy a smooth VPN experience anywhere, anytime. No matter the device you have — phone or laptop, tablet or router — VeePN’s next-gen data protection and ultra-fast speeds will cover all of them.
Download for PC Download for Mac IOS and Android App
Want secure browsing while reading this?
See the difference for yourself - Try VeePN PRO for 3-days for $1, no risk, no pressure.
Start My $1 TrialThen VeePN PRO 1-year plan


I travel a lot, and changing my iPhone location to the USA is a must for me to access certain apps. The VPN method has always worked well.
Has anyone tried using Tor for change iPhone location? How effective is it?
Tor alters your IP address; however, I noticed it was slower than a VPN, and it hasn’t an option of selecting a country of your choice like the United States. It is preferable for secrecy than viewing content related to a specific geographical location. A VPN is definitely far much better suited to that role.
I’m a bit worried about security when changing my iPhone location without a VPN. Is it safe to work with proxy server?
Though proxies do operate by masking a user’s location, they are not as secure and encrypted as a VPN. If privacy is an issue that matters much to you, I’d suggest that you stick to a VPN.
I can’t find my router number
I was searching for the procedures on how to change my iPhone location to the USA but now I realize that in some circumstances, proxy method may work. I can try doing it next time, because I always travel from Nairobi to my home in Eldoret.
OMG this guide is awesome!!
Nice!
If for instance you are not using a VPN to change your iPhone location, then there are a lot of advantages that you are not able to enjoy. This article gives a few examples, but there is nothing as secure and as convenient as a good VPN service.