Safari’s Private Browsing: How to Use It and How Secure Is It Really?
If you’re looking to enhance your online privacy on an iOS or macOS device, one of the most obvious options is to use the Safari private browsing mode. Once you open a private window or tab in your browser, it will prevent your search history from being recorded and won’t store cookies on the websites you visit. But does it make you completely private? Read along to find out whether Safari private browsing is really safe, how to activate or disable it, and what else you can do to hide your digital footprint from unwanted monitoring.

What is Safari private browsing?
Let’s start with the basics — here’s what Safari private browsing is and how it works.
The private browsing mode in Safari allows users to prevent the browser from logging their personal data, such as the pages they visit, search history, and AutoFill (smart search) information. Also, it stops trackers, fingerprinting techniques, and other common ways to identify users online.
Safari was the first browser that introduced private browsing back in 2005. When a user enters this mode, they create a separate browsing session that lasts only when a private window is open. Once you close it, your browsing data wipes out, leaving almost no trace on your device and other active sessions. As a result, other people with access to your device can’t see what you have been up to online.
Now, is Safari private browsing safe? Long story short, the private browsing mode doesn’t make your online presence entirely invisible, as multiple third parties, from your Internet service provider (ISP) to employers and school administrators, can still see your online activity (more on that in a bit).
Now, without further ado, let’s figure out how to use private browsing in Safari.
How to turn on private browsing in Safari
Here’s how to activate the Safari private browsing mode on macOS and iOS devices.
Mac
Take the following steps to turn on private browsing on your Mac:
- Open Safari on your Mac.
- Click File > New Private Window.

Alternatively, you can use the keyboard shortcut Shift + ⌘ + N to open a new private window in Safari.
Note that if you’re browsing in private mode, the address bar will turn dark grey or black.
iPhone and iPad
Follow these steps to activate private browsing in Safari on iPad or iPhone:
- Open the Safari app on your iPhone or iPad.
- Tap the Tabs button at the bottom right corner of your screen.

- Select the icon at the bottom center of the screen to choose between tabs.

- Choose Private (the icon with a hand showing a stop signal).
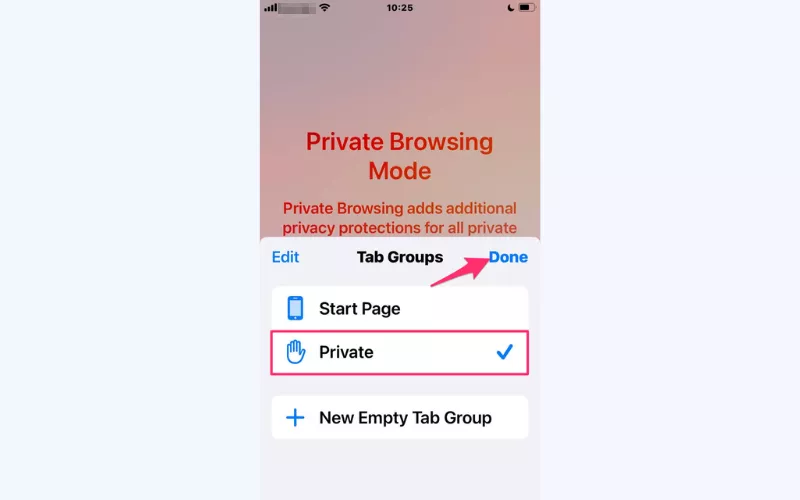
- Tap Done.
How to turn off private browsing in Safari
Now, let’s discover how to disable Safari private browsing on your Mac, iPhone, or iPad.
Mac
Take these steps to disable the private browsing mode on your Mac:
- If you’re browsing through a private window, simply close it to turn off private browsing.
- Click File > New Window to start a common browsing session.

iPhone and iPad
Follow these instructions to turn off Safari private browsing on an iPhone or iPad:
- Open Safari on your iOS device.
- Tap the Tabs button at the bottom right corner of your screen.
- Select the icon at the bottom center of your screen.
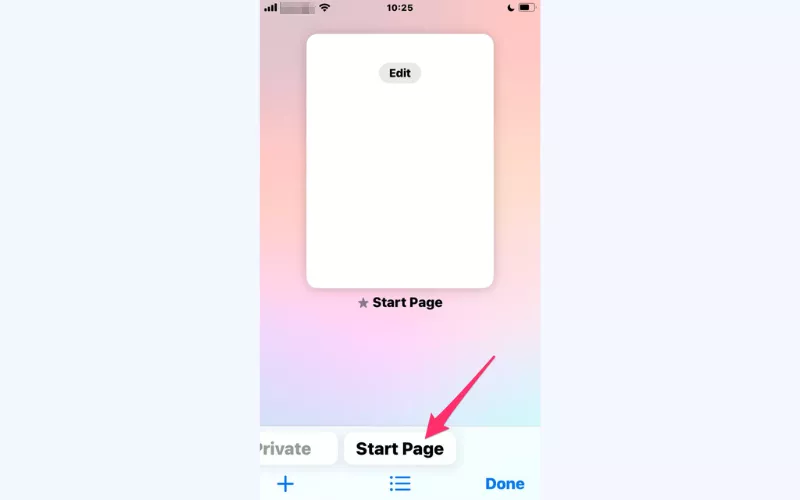
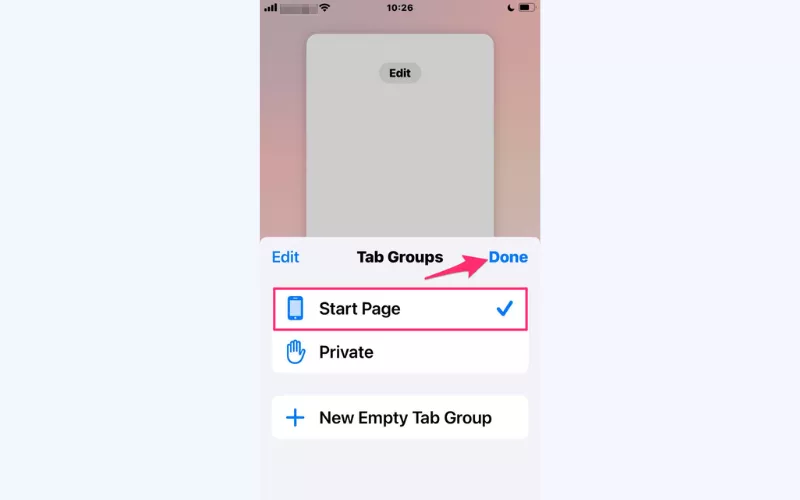
- Tap Start Page > Done to quit the private browsing mode.
How to set Safari to private browsing as default
It’s also possible to enable private browsing by default whenever you open a new window in Safari. For that, follow these instructions:
- Open the Safari app on your device.
- Head to Safari menu > Preferences.

- In the General section, open the dropdown menu next to “Safari opens with:”

- Select the “A new private window” option.

How to clear Safari private browsing history on Mac
Although your search history isn’t stored directly in the browser after you finish your private browsing session, this information is still available on your device. Users with enough tech knowledge can easily access it through the Console and Terminal apps in your device’s Utilities.
To prevent this, you might also want to know how to clear your private browsing history in Safari. Take the following steps to remove this data from your device:
Step 1: Access your private browsing history in the Console
- Open Utilities > Console.

- Select your device in the sidebar.

- Type any:mdnsresponder in the search box and click the Play button in the search bar.

Step 2: Enter Terminal
- Open Utilities > Terminal.

- Type the sudo killall -INFO mDNSResponder command.

- Press Return on your keyboard.
- Provide your admin password.
- Go back to the Console to view your private browsing history.
Step 3: Clear your private browsing history
- Head to Utilities > Terminal.
- Type the sudo killall -HUP mDNSResponder command.

- Press Return.
- Provide your admin password.
- Done! You’ve cleared your Safari private browsing history.
💡 Pro tip: Want to keep your devices safe? Find out how to clear your cache and other data on your Mac and iPhone in our recent blog articles.
Is Safari browsing really private?
Remember we mentioned that the private browsing mode in Safari is not 100% private? The thing is that when you surf the web through a private window, you protect your data from being monitored only to some extent. To be more specific, let‘s explore what private browsing does and what it doesn’t do in terms of your digital privacy.
Key features of private browsing:
✅ Doesn’t store your web search history
✅ Limits cookies and cross-site tracking
✅ Clears cookies when the session is over
✅ Hides your identity from known trackers
✅ Warns you about questionable websites
✅ Disables autofill features for usernames, passwords, credit card info, Apple Pay, and other personal data
Limitations of private browsing:
❌ Lets websites track some of your data, including your location, device details, and the browser you’re using
❌ Doesn’t protect you from hackers, malware, and phishing attacks
❌ Doesn’t stop spyware and malicious apps
❌ Doesn’t hide your activity from your ISP, Wi-Fi owners, and network administrators at school or work
❌ Doesn’t conceal your digital identity and IP address
❌ Doesn’t encrypt your data
❌ Stores your browsing and search history in the device’s Terminal archive
At this point, you may wonder whether other browsers come with a greater level of privacy and security. One of the most popular options is the incognito mode in Google Chrome — but is it any better than private browsing in Safari? Let’s figure out.
Safari’s private browsing vs. Google Chrome’s Incognito Mode: Which is safer?
In a nutshell, private browsing in Safari and incognito mode in Chrome are very similar in terms of their features and limitations. Both remove your data from the device when your browsing session is over while leaving your digital footprint traceable for third parties. But when it comes to customer privacy, Safari comes with several additional measures that Chrome lacks. Let’s take a look at a brief comparison of private searches in these two popular browsers.
| Private browsing mode (Safari) | Incognito mode (Google Chrome) | |
| Data sharing across separate tabs | 👍 Each tab has separate privacy settings and doesn’t share temporary cookies. | 👎 Privacy settings and cookies are shared across tabs. |
| Activity and identity tracking | 👍 Safari has additional features to prevent cross-site tracking of online activities. | 👎 Chrome allows web services to track your activity and identity even in incognito mode. |
| Location tracking | 👍 Safari doesn’t store your location. | 👎 Chrome stores your location. |
| Cybersecurity | 👎 No protection against hacks and malware. | 👎 No protection against hacks and malware. |
| ISP and Wi-Fi administrator monitoring | 👎 Possible | 👎 Possible |
As you can see, Safari private browsing is somewhat safer than the incognito mode in Google Chrome. But still, neither solution is bulletproof. So, if your goal is to make your online presence more private and secure, it’s worth considering some alternative ways to protect your browsing experience and safeguard your digital identity.
Two alternative ways to browse privately
Let’s look at the two most effective ways to boost your online privacy and browse the web safely on your Mac, iPhone, or iPad.
1. Use a VPN
A virtual private network (VPN) is a powerful cybersecurity tool that covers the following aspects of your digital life:
- Truly private browsing. A VPN hides your IP address and shields your personal information from unauthorized access. It reroutes your traffic through a remote server and provides additional functionality like DNS and IP leak protection.
- Increased online security. A VPN also comes with strong cybersecurity features, including protection against phishing, malware, and hacks.
- Data encryption. A VPN covers your data with end-to-end encryption, meaning that even if someone manages to access your personal details, they will only see gibberish code that is nearly impossible to crack.
- Safety on public Wi-Fi. A VPN safeguards your connection on unprotected networks in public places like hotels, rented apartments, restaurants, and airports. It’s a decent measure against common public Wi-Fi threats like man-in-the-middle (MITM) attacks, browser hijacking, and malware distribution.
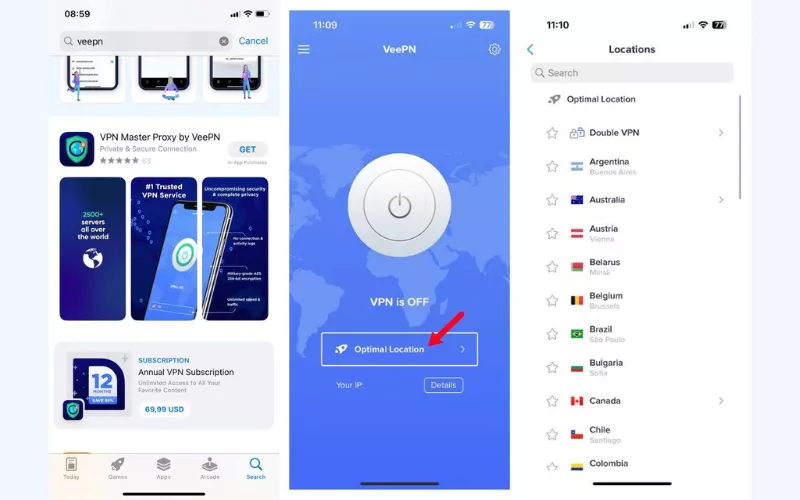
Luckily, this tool is extremely easy to set up and use. All you need to do is pick a credible VPN for iPhone or a solution for Mac, download the app on your device, and connect to one of the available servers. Once done, you will get an extra protection layer allowing you to surf the web with peace of mind.
2. Use a more private web browser
Another possible step is switching to a more private web browser. While Safari is definitely not the worst option (remember that Google and Microsoft are not so devoted to protecting customer confidentiality), several solutions offer even greater protection. Here are some of the most privacy-friendly browsers to consider:
- Brave. The Brave browser comes with numerous decent privacy features, including anti-fingerprinting tools, a default anti-tracking solution, and an ad-blocker. Also, Brave uses open-source code, which results in increased security and transparency. But the built-in VPN is only available with the browser’s paid version. Also, Brave is primarily focused on crypto, making some of its functionality and settings too complex for regular users.
- Mozilla Firefox. Firefox is a privacy-focused web browser that offers numerous features for data protection. In particular, it can automatically delete your browsing history and other data after each session. Also, it has built-in blockers of ads and trackers and fast connection speeds. Firefox does share some of your data with vendors, but you can disable it in the browser settings.
- DuckDuckGo Privacy Browser. DuckDuckGo is famous for its private search engine, but it also offers a secure web browser. Its key features include ad and tracking blockers and a rating of websites in terms of customer privacy. Besides, DuckDuckGo doesn’t record and store your search history. The only downside of this browser is that its search is based on Bing, which belongs to Microsoft.
- Aloha. Another great option for Mac and iOS users, Aloha offers anti-monitoring functionality, as well as ad-blocking tools and enhanced security of downloads. Also, it has an integrated VPN. Similar to Firefox, Aloha collects some of your data to improve user experience and shares it with partners. But you can disable this in your browser settings.
💡 Want to pick the best browser for your privacy? Feel free to check out a detailed overview of the safest browsers in our blog.
Protect your online privacy with VeePN
Safari private browsing protects your data from other people who can access your device. But if you strive to enhance your online privacy at all levels, a VPN is your go-to. Consider VeePN — a reputable VPN service provider that comes with the following perks:
- Secure connection. Protect your data on public Wi-Fi spots — communicate, stream content, and even conduct money transactions safely and securely wherever you are.
- NetGuard. Prevent third-party tracking and other common threats lurking across the web. Shield yourself from malware, phishing, scams, and hacks with the VeePN NetGuard feature.
- AES-256 encryption. Cover your traffic with the strongest encryption standard to date empowered with modern and secure VPN protocols. Make sure no one can spy on you online.
- Kill Switch. Turn on the Kill Switch feature to protect your sensitive information from being exposed in case your VPN connection fails. It will instantly interrupt your Internet connection to prevent leaks and keep you safe at all times.
- Breach Alert. As a part of VeePN’s Security Bundle, Breach Alert is a handy tool that lets you monitor your confidential information, such as login credentials and credit card data, and get notified once it’s detected in known security breaches.
You can install VeePN on up to 10 devices simultaneously and enjoy your digital privacy, no matter which browser and operating system you prefer. Get a VPN for Mac or a VPN for iOS and try it out risk-free with a money-back guarantee!
FAQ: Safari Private Browsing
To turn on private browsing on a Mac, open Safari and click File > New Private Window. On an iPhone or iPad, tap the Tabs icon at the bottom-right corner of your screen, select Tabs at the bottom-center, and tap Private > Done. For more information on how to use private browsing in Safari, check out this article.
Safari has private browsing, which is similar to the incognito mode in Google Chrome. To enter it, use the Shift + ⌘ + N keyboard shortcut on a Mac or Tabs > Private > Done on an iPhone or iPad. But remember that the private browsing mode only keeps your search history invisible to other people who can access your device, while not making your online presence truly private.
To disable the private browsing in Safari on iPhone, take these steps:
- Open Safari and tap the Tabs icon.
- Select the icon at the bottom center of your screen.
- Tap the Start Page option and select Done.
Read this article to learn more about the private browsing mode in Safari.
VeePN is freedom
Download VeePN Client for All Platforms
Enjoy a smooth VPN experience anywhere, anytime. No matter the device you have — phone or laptop, tablet or router — VeePN’s next-gen data protection and ultra-fast speeds will cover all of them.
Download for PC Download for Mac IOS and Android App
Want secure browsing while reading this?
See the difference for yourself - Try VeePN PRO for 3-days for $1, no risk, no pressure.
Start My $1 TrialThen VeePN PRO 1-year plan
