How to Change Download Locations for Popular Browsers and Secure This Process
In most popular web browsers, your downloads are saved in a “Downloads” folder. This can be inconvenient for a myriad of reasons, so you may want to select another folder for saving your downloads there. To help you deal with this task, we’ve prepared a detailed guide on how to change download locations for popular browsers. You are welcome to read it!

Steps to change the default download location for your browser
Here are step-by-step instructions on how to change the download location in most common browsers like Google Chrome, Microsoft Edge, Opera, and Mozilla Firefox.
Change Chrome download location
To change the download location in Chrome, follow these steps:
1. Open the Chrome menu by clicking the button with three horizontal bars at the top right, and choose Settings.
2. Scroll to the bottom of the Settings page and click on the Advanced link.
3. Within the Downloads section, click the Change button. Select the destination folder for downloaded files and click OK.
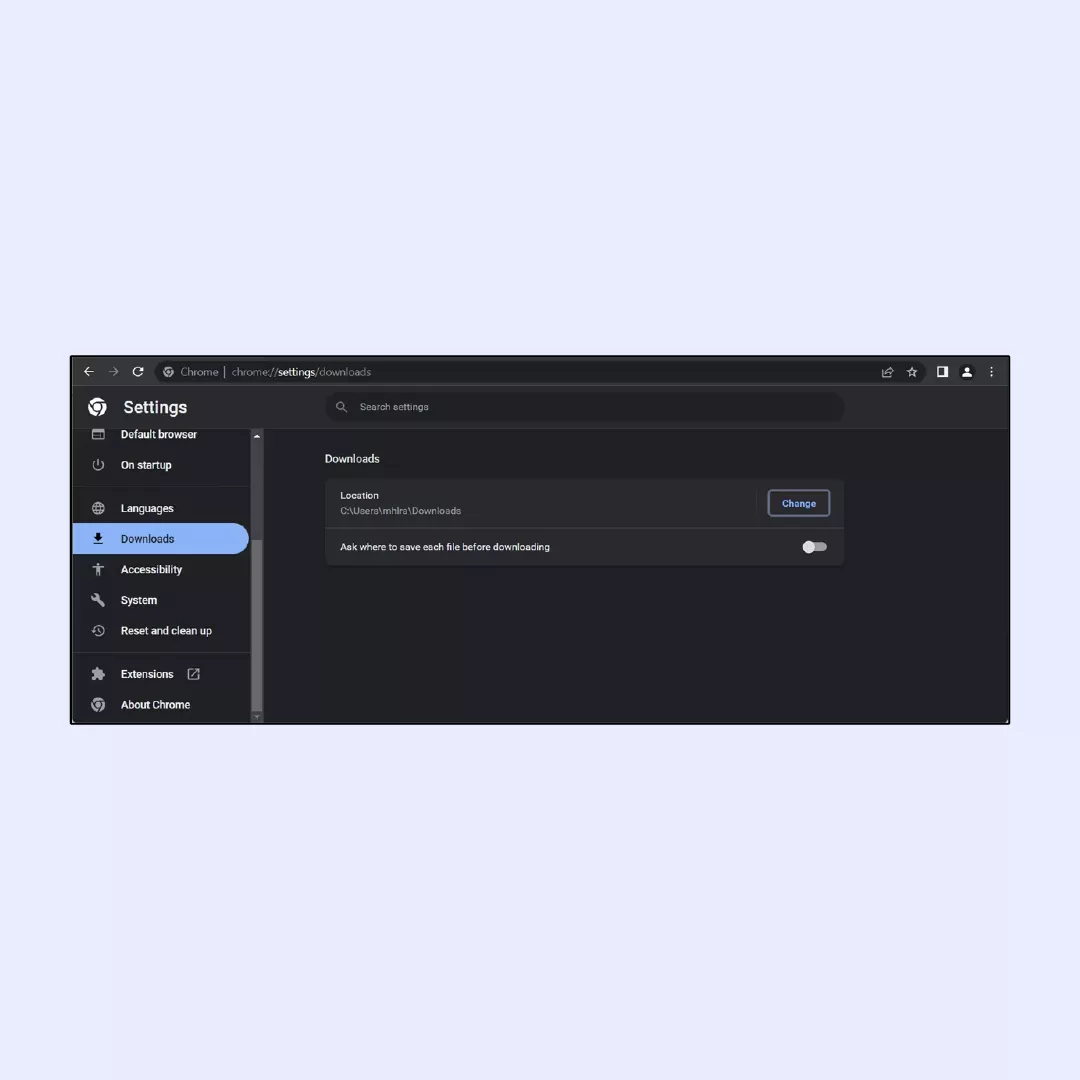
There, you will find the path to the chosen folder displayed below Location.
However, you may want to save your downloaded files in different folders. You can make Chrome ask you to specify the download location every single time you download a file and here’s how:
1. Open the Chrome menu by clicking the button with three horizontal bars at the top right, and choose Settings.
2. Scroll down to the bottom of the Settings page and click on the Advanced link.
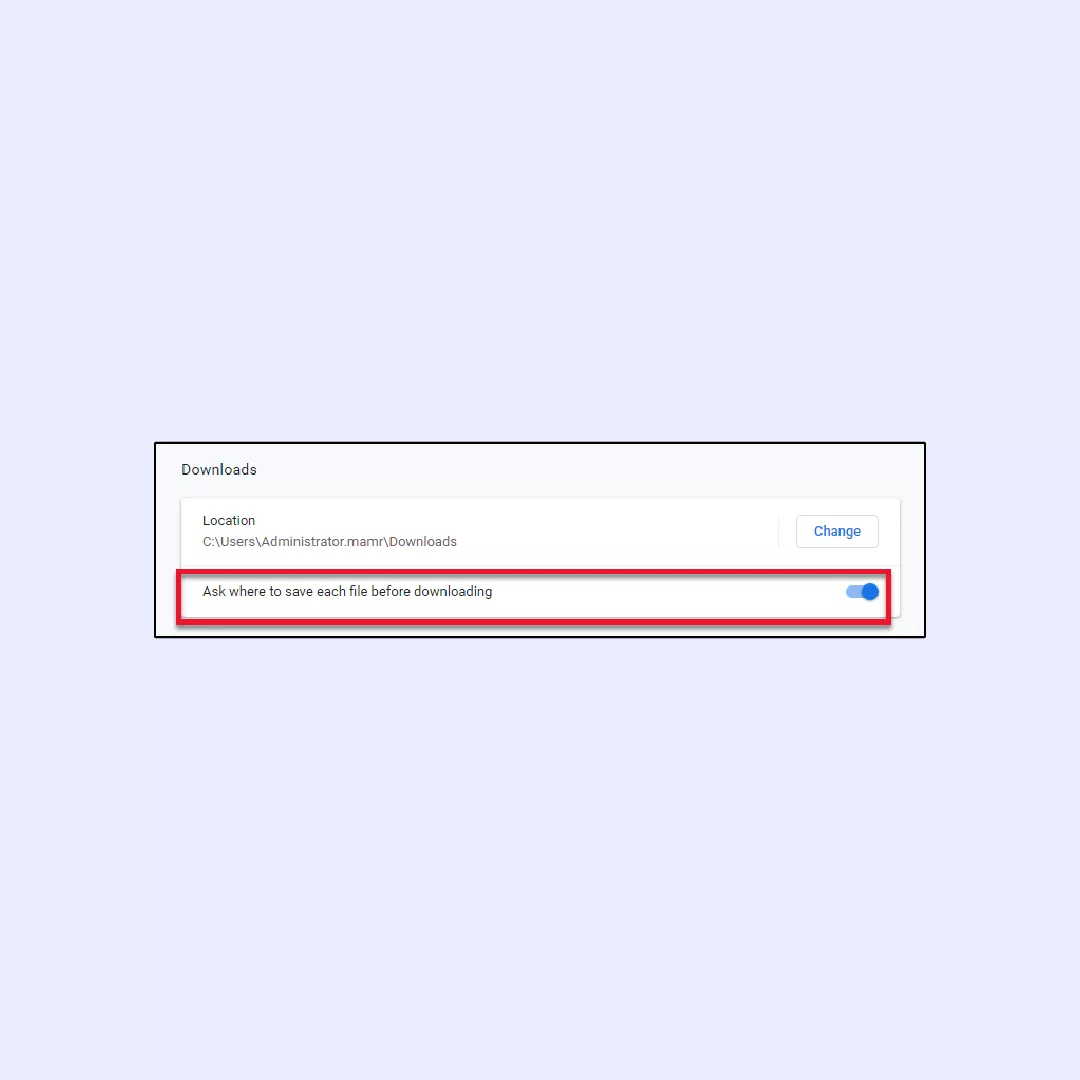
3. Within the Downloads section, enable the “Ask where to save each file before downloading” toggle.
Change Microsoft Edge download location
To change Edge download location, you need to do the following:
1. Open the Edge menu by clicking the button with three horizontal dots at the top right. Select Settings, and then click on View advanced settings.
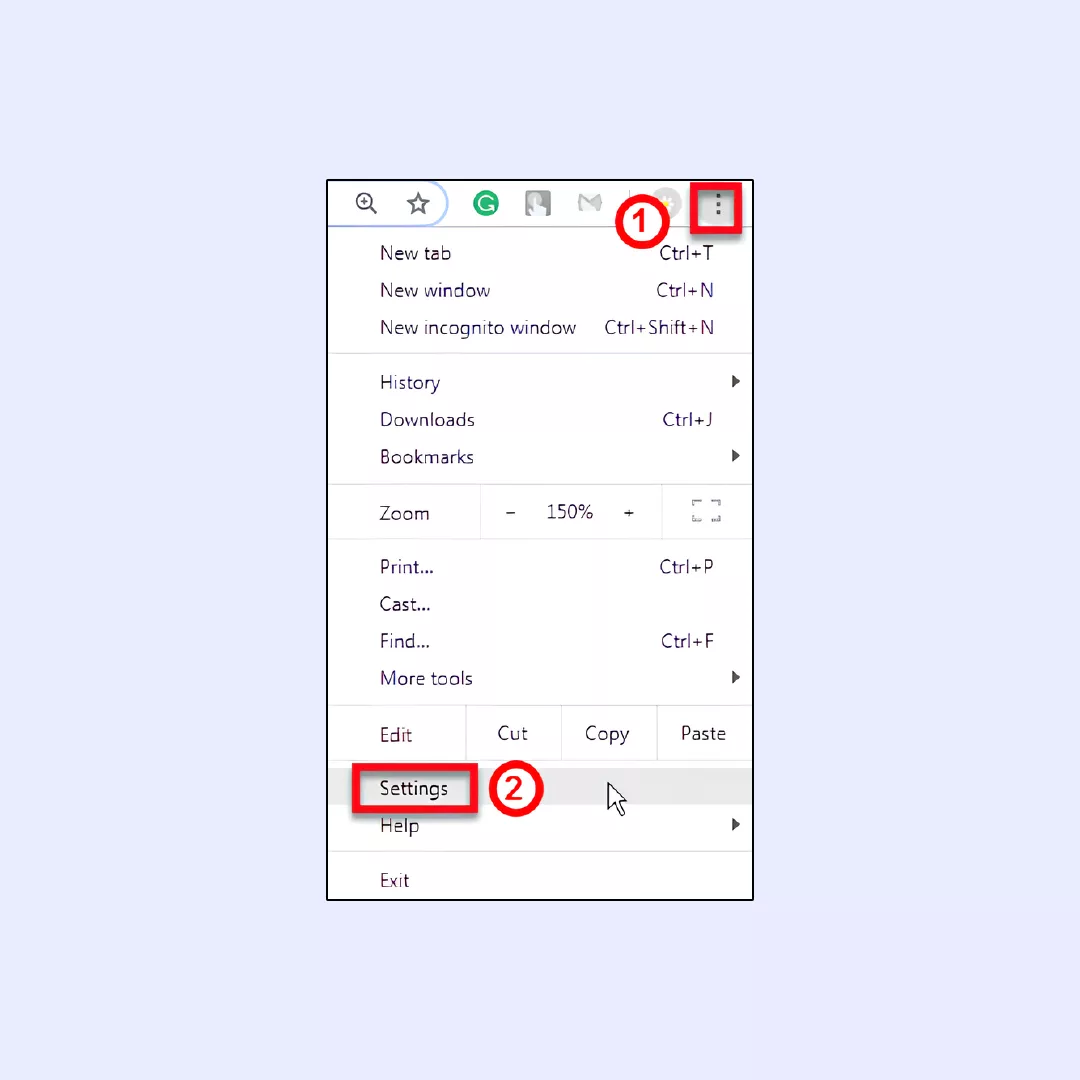
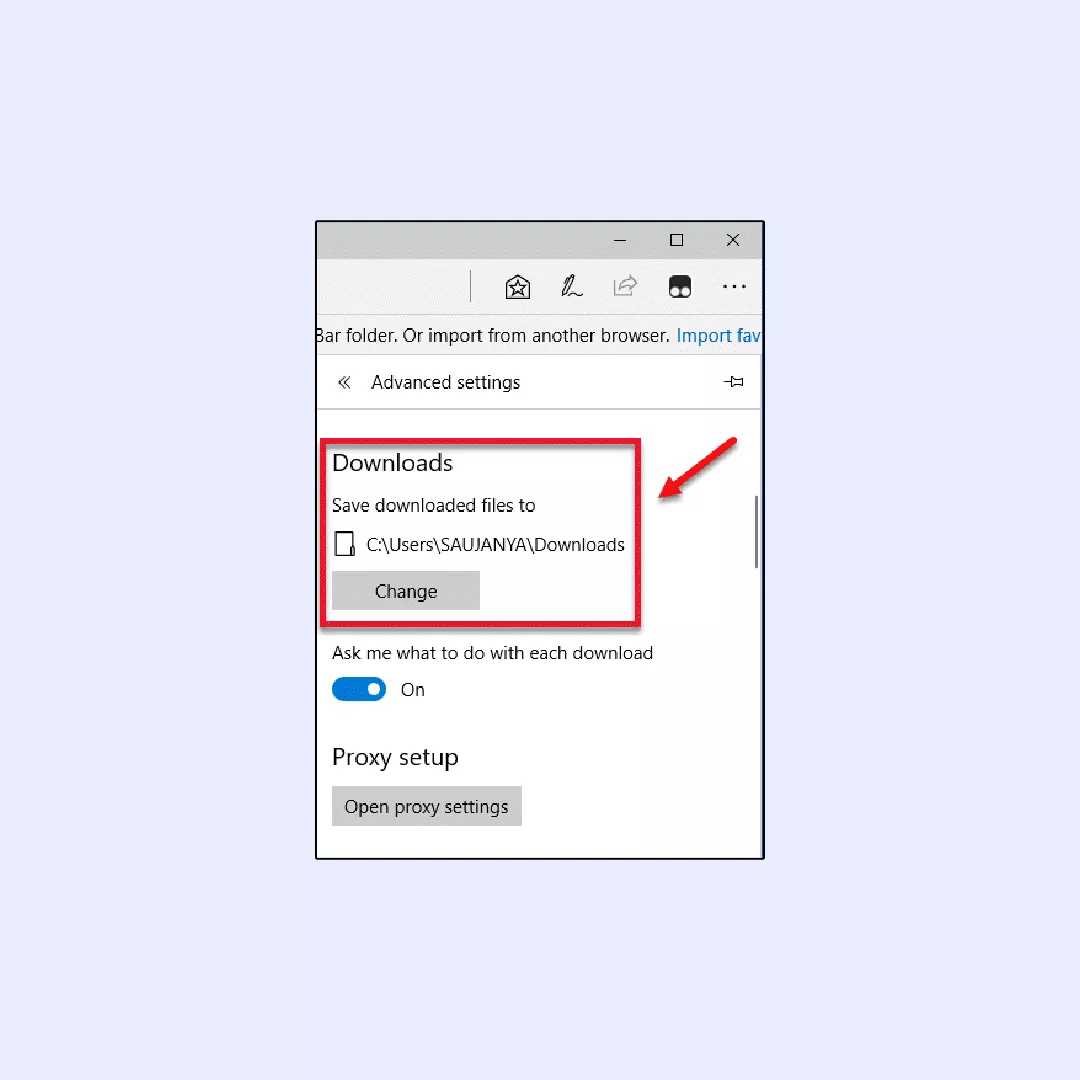
2. In the Downloads section, click the Change button. Choose the destination folder for downloaded files and click Select Folder.
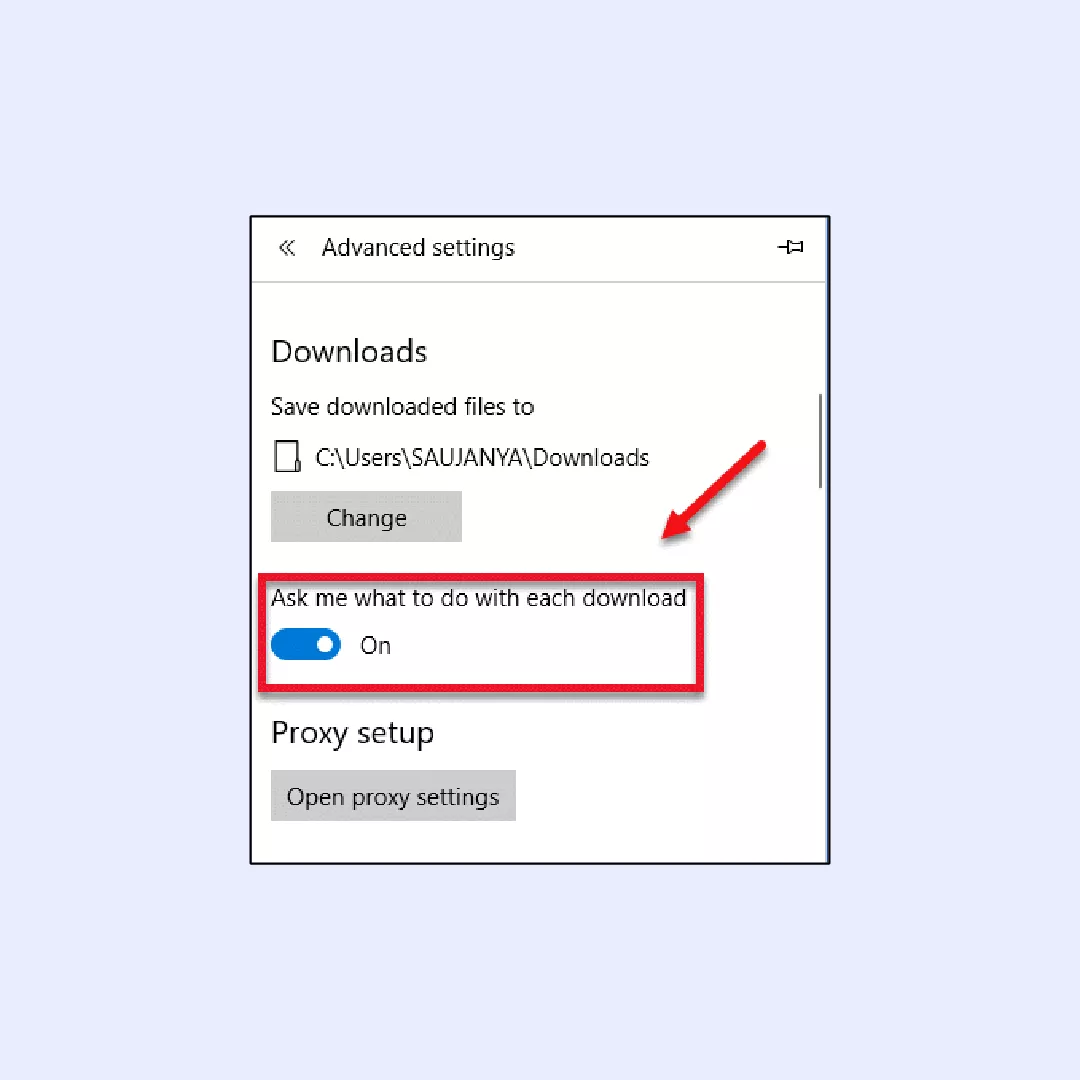
Now, you will be able to view the path to the selected folder below “Save download files to.”
To enable Edge to ask you for the download folder location each time, follow these steps:
1. Click the Edge menu button (three horizontal dots) at the top right.
2. Select Settings, and then click on View advanced settings.
3. Under Downloads, toggle on the “Ask me what to do with each download” option.
Change Opera download location
1. Click on the Settings icon — the symbol with three horizontal bars.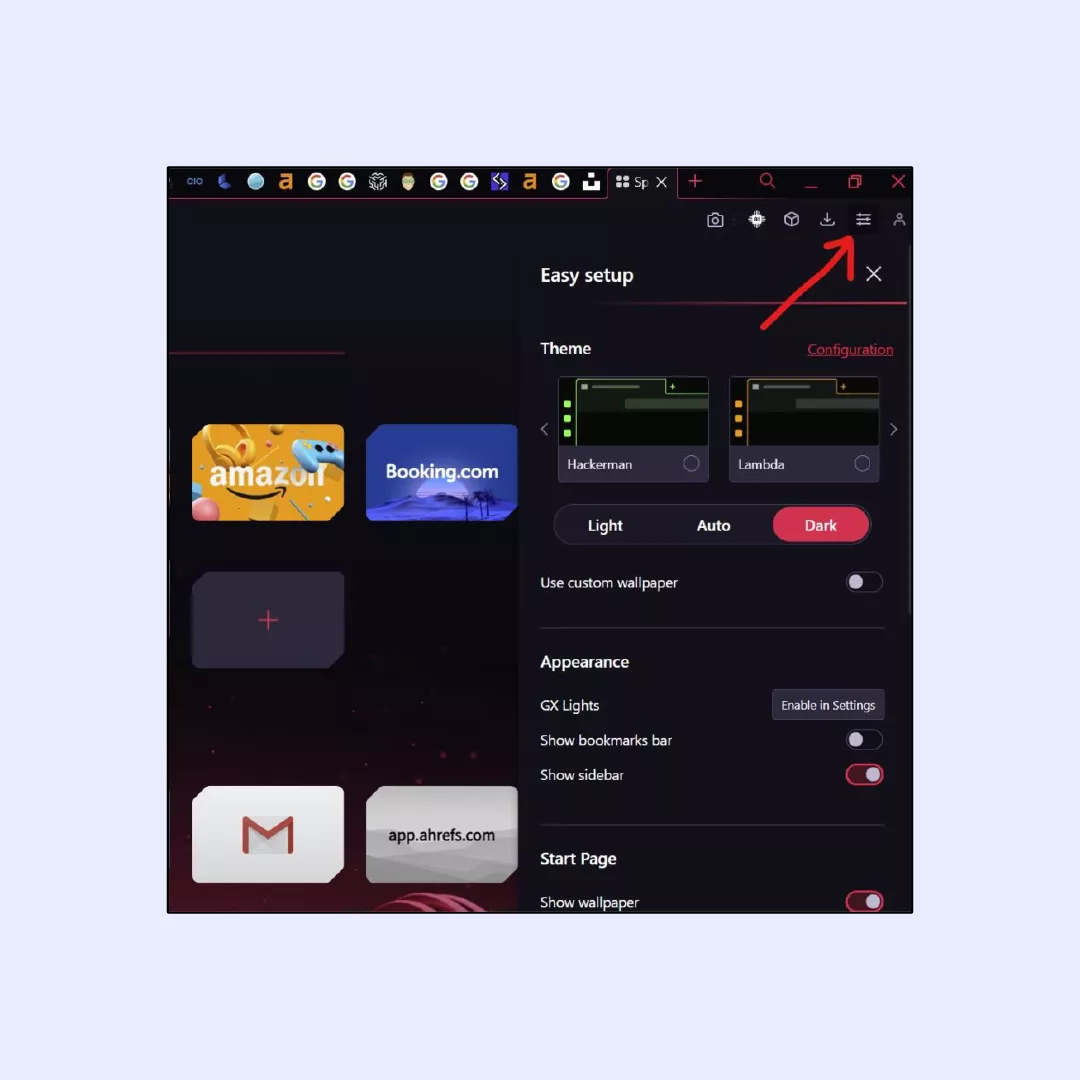
2. Scroll down and open the Full browser settings menu.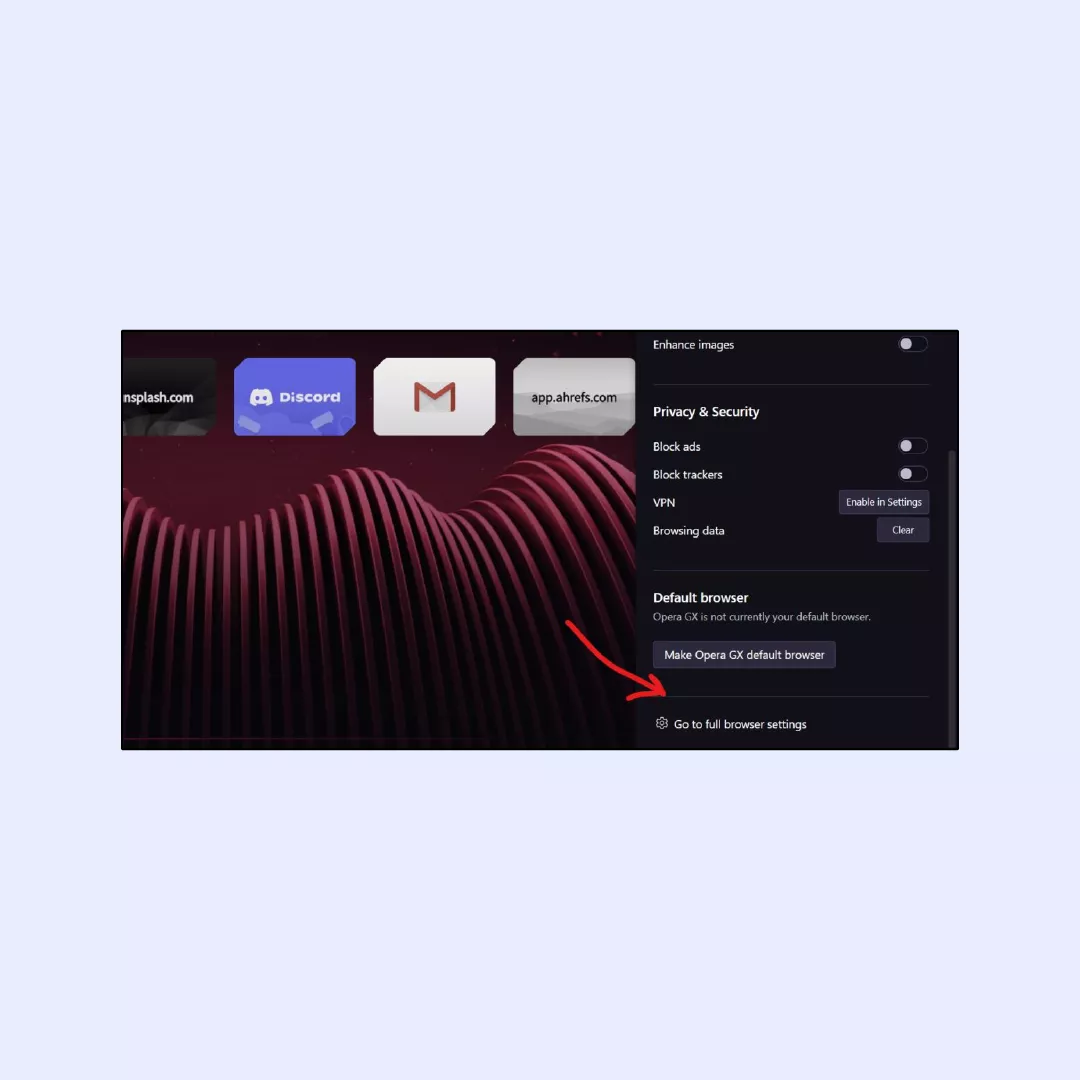
3. Navigate to the Advanced and find Downloads section.
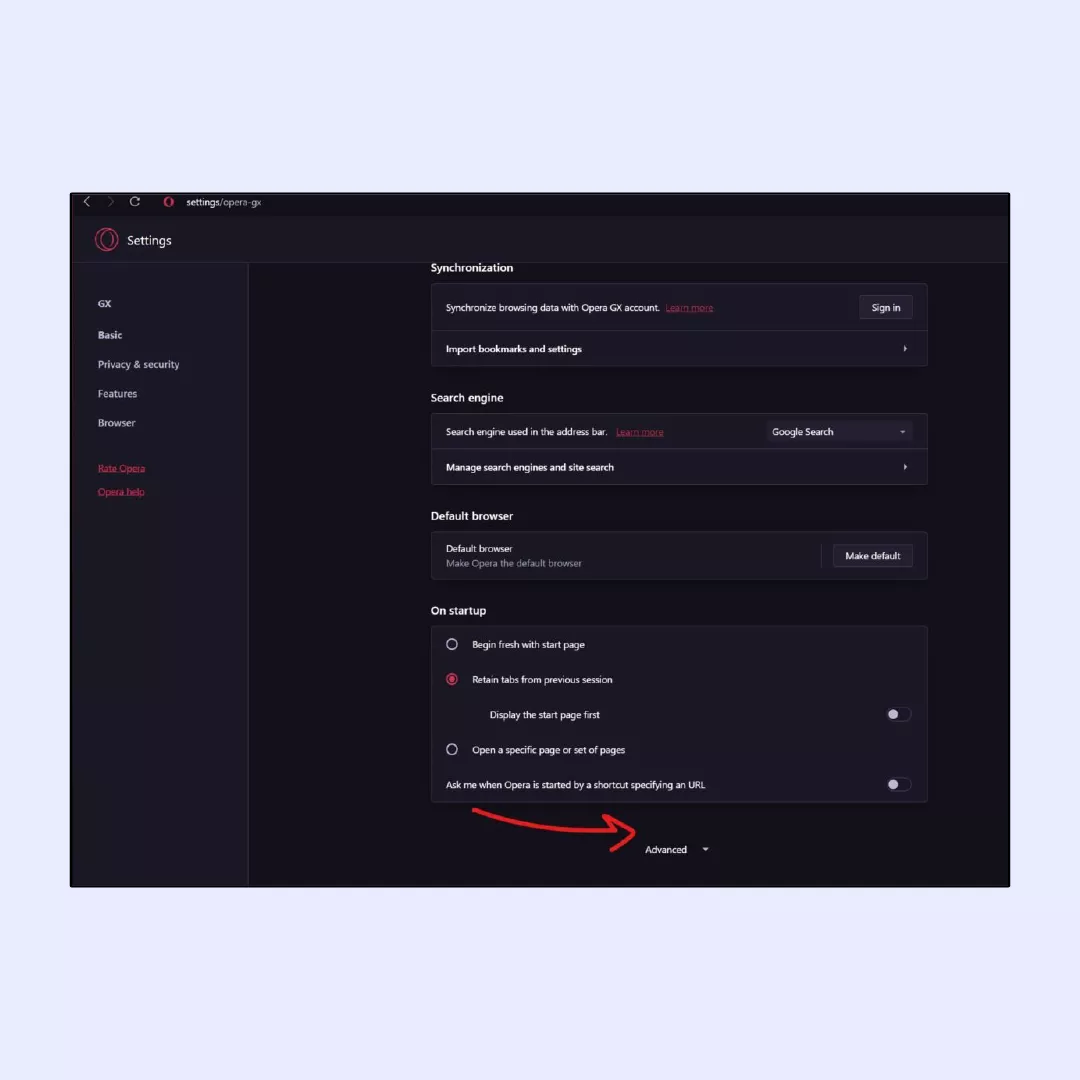
4. Click on the “Change” button.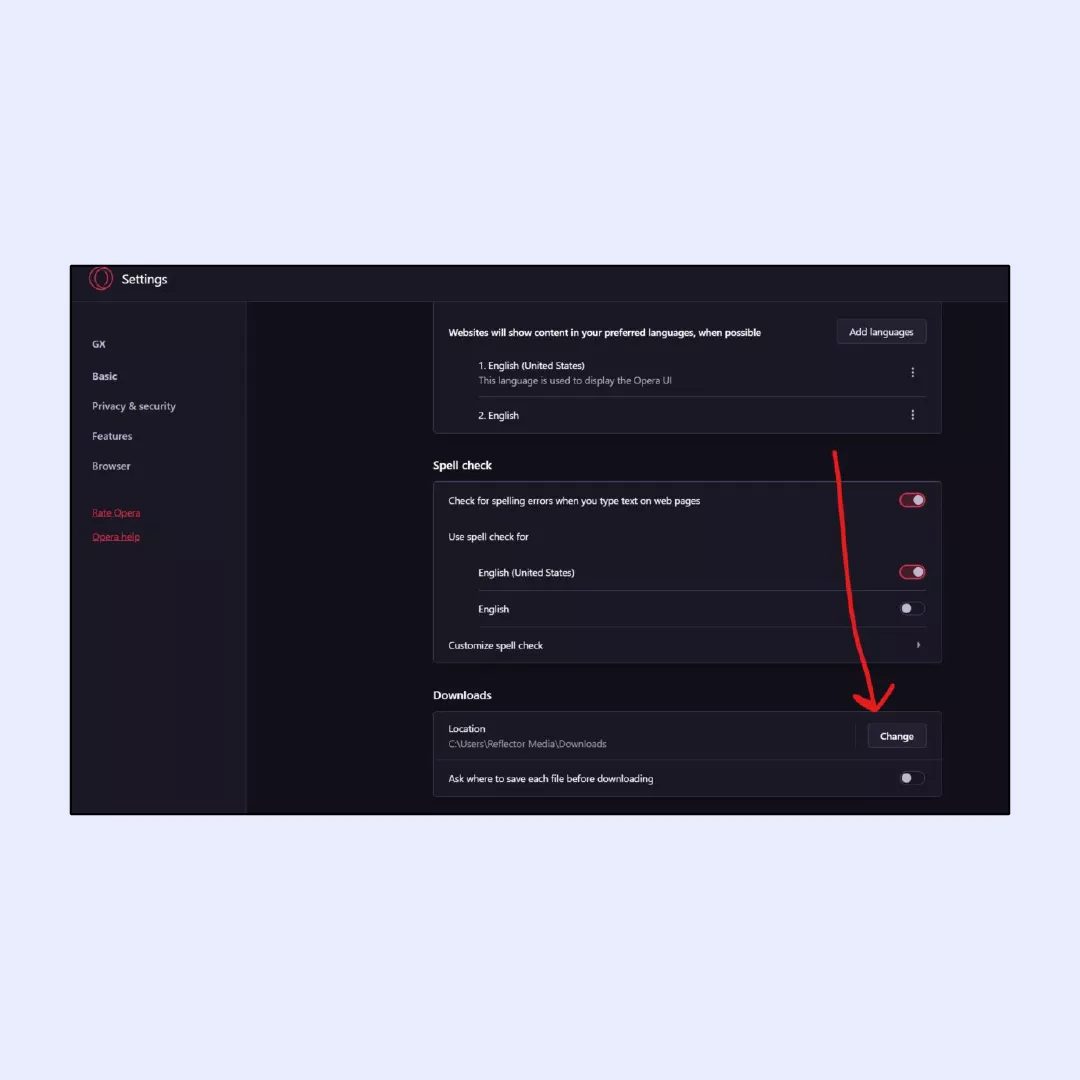
5. Choose a new download location from the options provided.
If you want Opera to ask you to select a download location each time, follow these steps:
1. Open the Opera browser on your computer.
2. Navigate to the Settings page by clicking the gear icon in the sidebar.
3. Scroll down to the bottom to access Advanced settings.
4. In the Downloads section, find the “Locations” option.
5. Click “Change” for the Locations option.
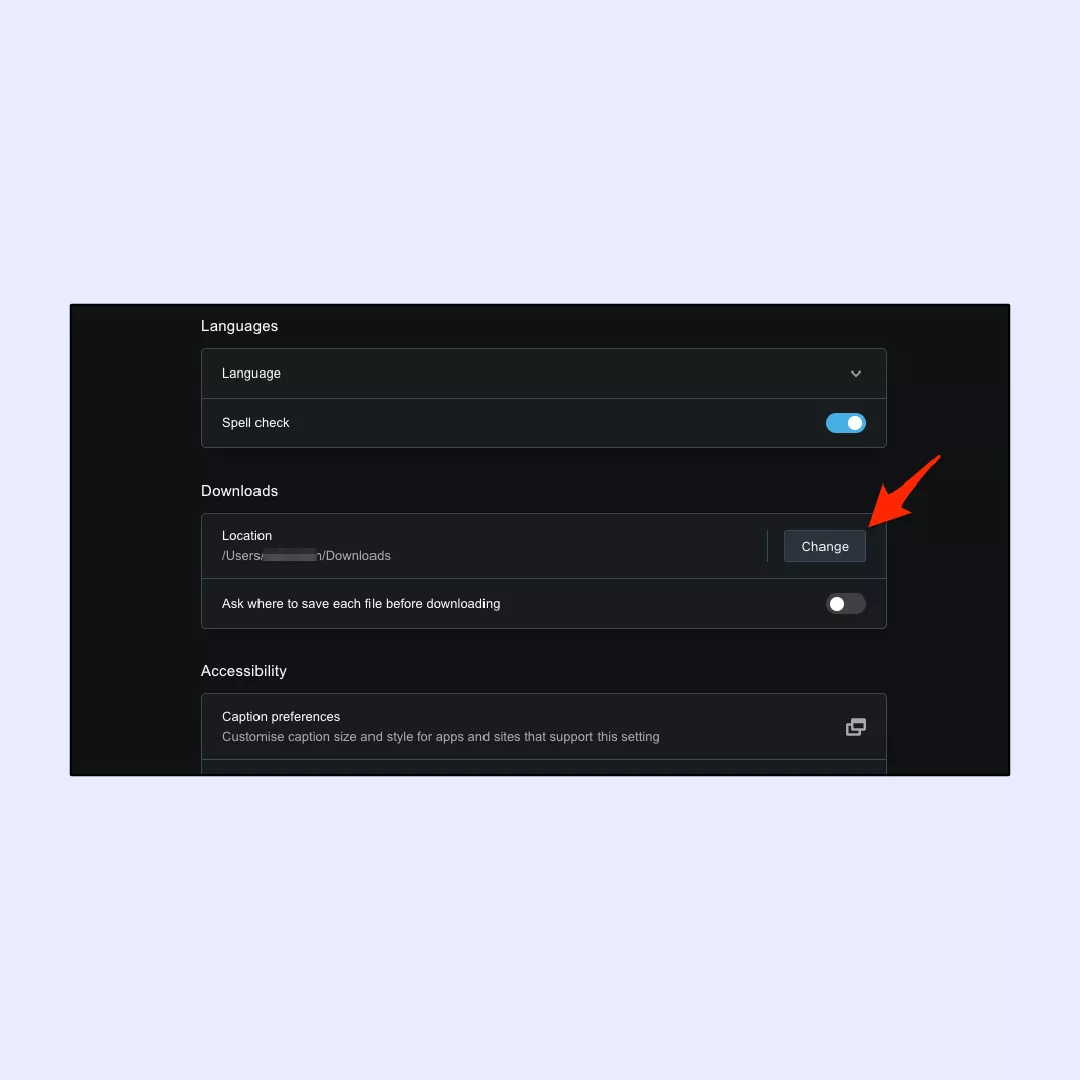
6. Select your desired download location using Finder (on macOS) or File Explorer (on Windows).
7. Confirm the changes by clicking “Select.”
8. Toggle on the “Ask where to save each file before downloading” option.
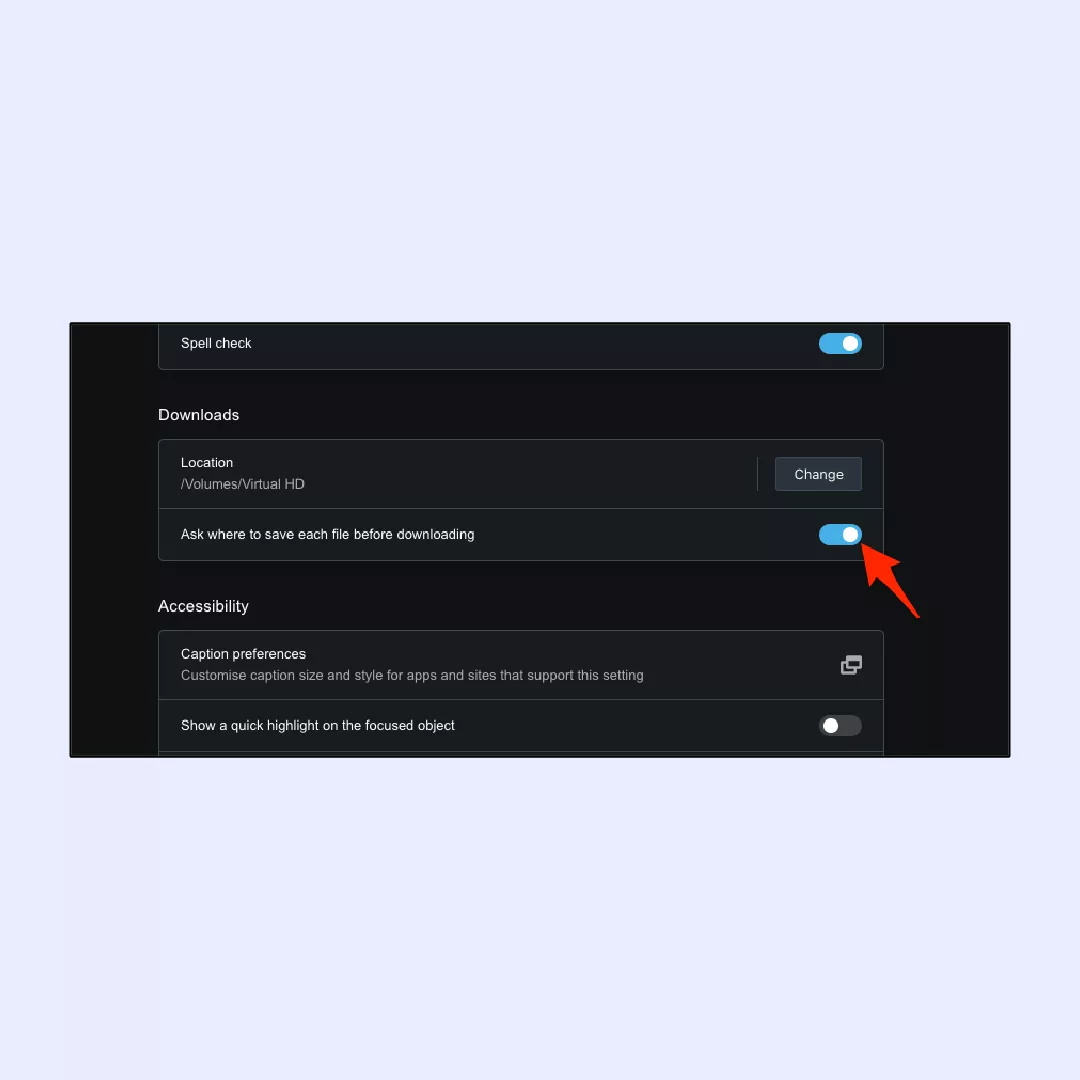
Following these steps will make Opera ask you for the download location each time you download a file.
Change Mozilla Firefox download location
Changing download location in Firefox is pretty straightforward, here are the main steps.
1. Click the Firefox menu button (three horizontal bars) located at the top right, then choose Options.
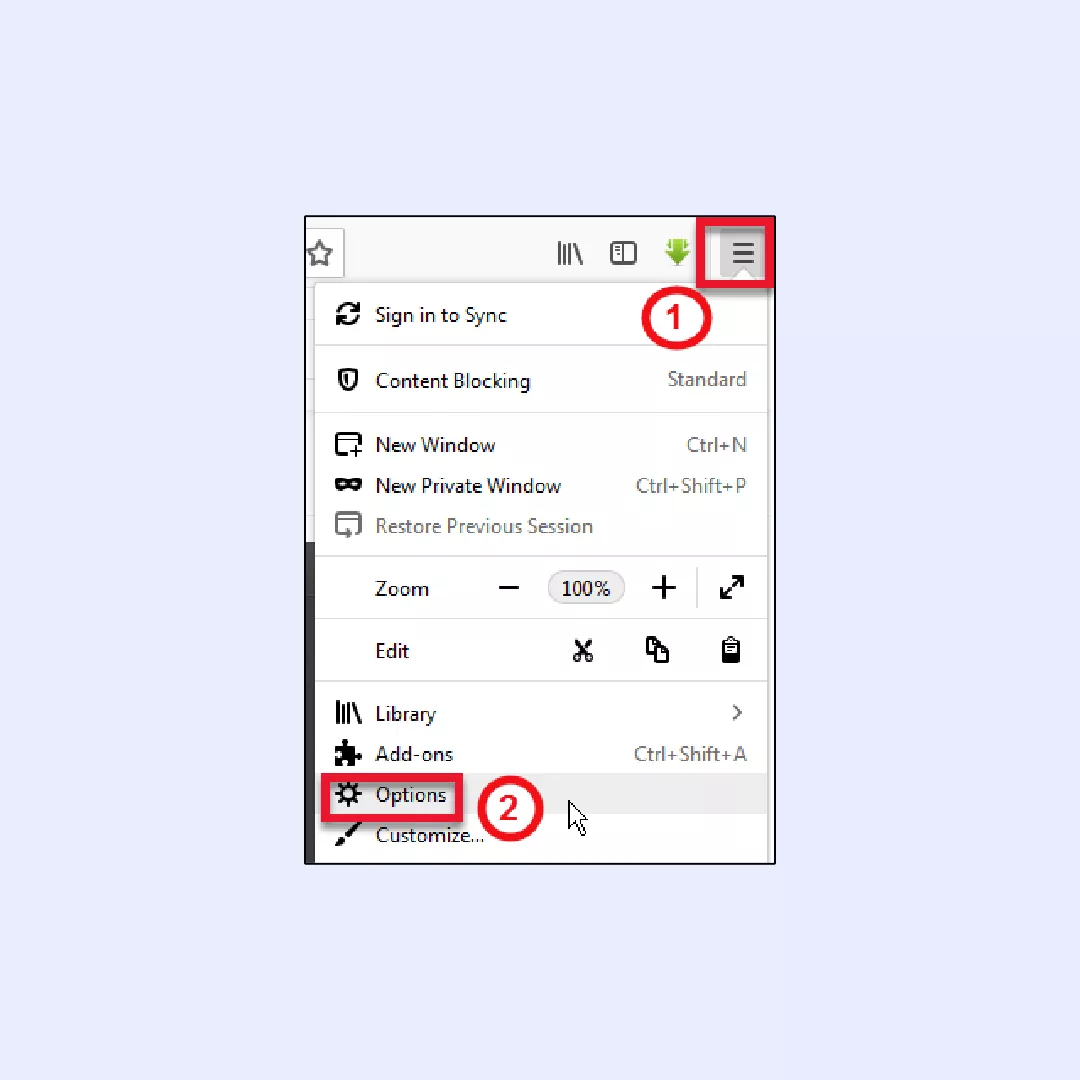
2. Navigate to General > Downloads, and click the Browse button.
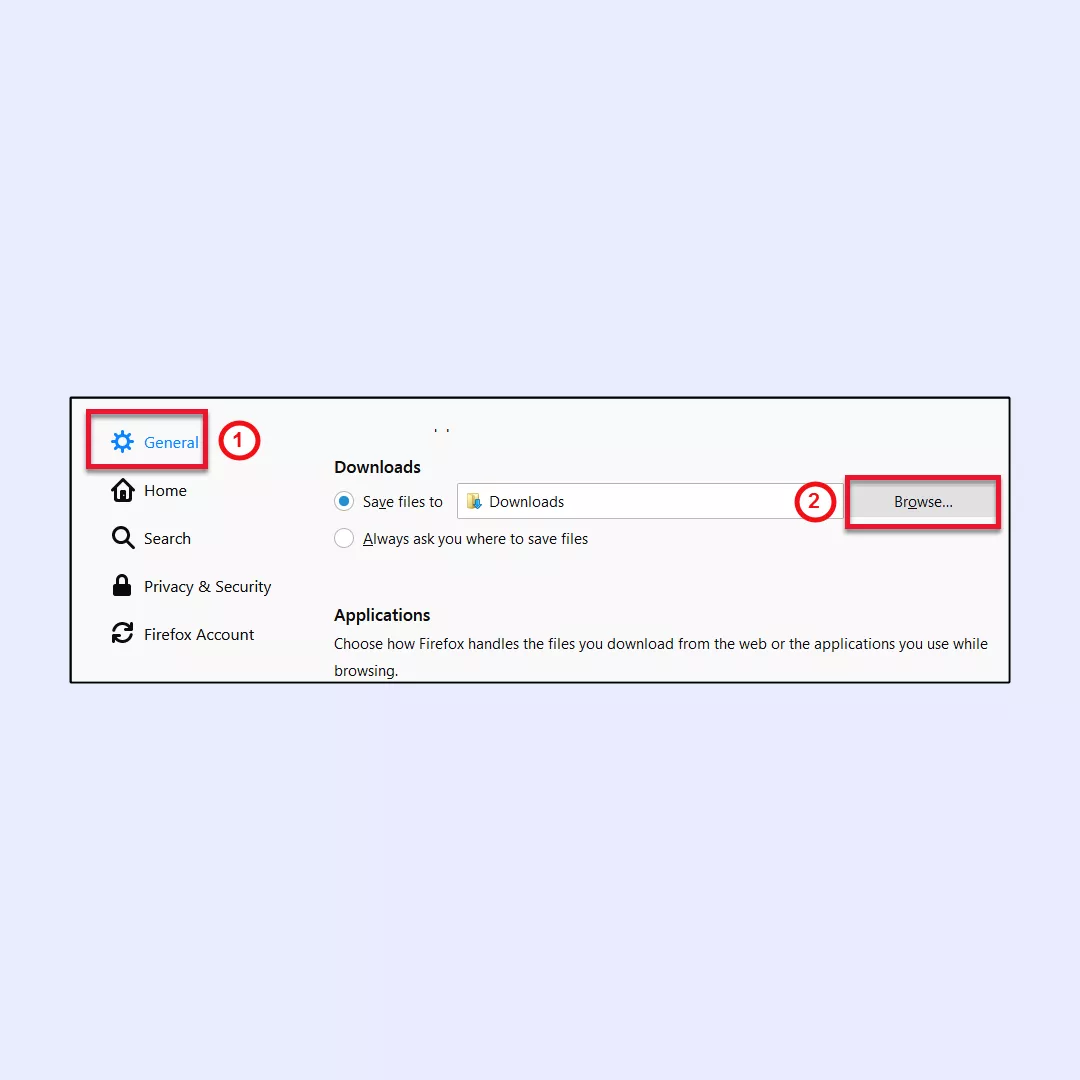
3. Select the folder where you want files to be downloaded, and click Select Folder.
4. The path to the chosen folder will now be visible in the Save files box.
To make Firefox always ask where to save files, follow these simple steps:
1. Click the Firefox menu button (three horizontal bars) at the top right, then select Options.
2. Under General > Downloads, select the option “Always ask you where to save files.”
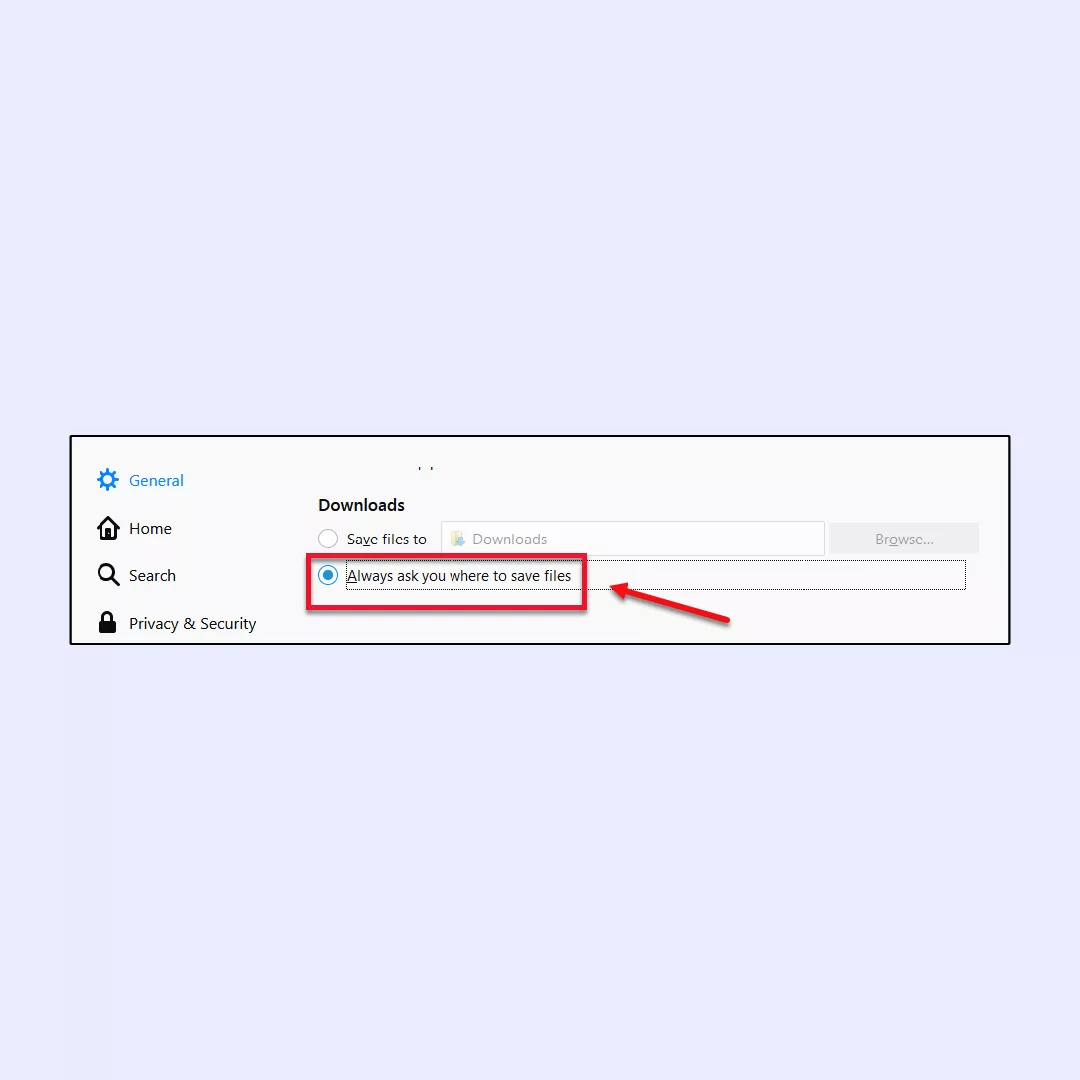
After making this setting change, when you download a file, Firefox will prompt you to choose the location where the file should be saved.
Change Safari download location
By default, Safari’s download manager saves files in the “Downloads” folder on your Mac. However, you can easily customize the storage location. To change download location in Safari browser, do the following:
- Open Safari on your Mac.
- In the menu bar, select Safari -> Preferences….
- Go to the General tab and click the dropdown menu next to File download location.
- Choose either Ask for Each Download or Other… to select a specific location for all your downloads.
- To view your recent downloads, you can access Safari’s download manager by selecting View -> Show Downloads from the menu bar or by pressing Option-Command-L on your keyboard.
Changing browser download location settings isn’t rocket science, so with this guide, you won’t have to worry about forgetting any step. What you really should be worried about is the security of your downloads.
Every single time you download something from the internet, you take a risk as you can’t be 100% sure that the file is safe or that nobody is snooping around in an attempt to steal your personal information. In fact, there have been around 5.5 billion malware attacks since 2023, which means you should take your internet safety as seriously as never before.
And there is no better way to shield your online privacy than to use a virtual private network (VPN) for web browsing.
Why should you use VPN to protect your downloads?
The internet is indeed a dangerous place to walk around without being vigilant enough. Snoopers, hackers, advertising agencies, and just silly tricksters are almost always around the corner of every website and social media, even though you may think that a resource you visit is totally safe.
For that reason, using VPN is really a wise course of action, as relatable services can provide you with:
- Safe data transmission. VPN encrypts all the data that goes back and forth via your browser and apps that use internet connection. In such a way, your private information won’t leak and it’s hard to track your online activity as all the data turns into a bunch of random letters, numbers, and symbols.
- Privacy protection with IP address masking. Since a VPN app connects your device to a remote server, your real IP address becomes invisible, so nobody will be able to see it and track your whereabouts.
- Online security while using a public Wi-Fi. Public Wi-Fi hotspots welcome anyone to use them, making it a honeypot for hackers and fraudsters. But with a reliable VPN application, you’ll be able to shield your device from any hacker attacks, even though a hacker can sit at the next table hoping they’ll pay for their double espresso with your credit card.
- Content access when traveling abroad. As a cherry on top, VPN enables you to access content while you’re traveling. Some countries may restrict access to your favorite TV show, game, series, or sports event, but with VPN you’ll watch them as if you are sitting on your couch at home.
It all sounds perfect, and you might have considered some free VPNs. But will they make your online experience truly secure?
Will free VPN services do the trick?
A short answer is “They may, but it’s always a give-and-take game”. The matter is that free VPN services don’t use the most reliable security standards and might even sell users’ personal information to third parties, so using them isn’t safe after all. On the contrary, paid VPN services like VeePN can guarantee top-notch security online thanks to the following features.
- AES 256-bit encryption. Even the U.S. government swears by it, and the National Security Agency trusts this protocol to keep their classified info under wraps. Now, not every free VPN can afford this kind of tech, but VeePN’s got it covered to keep your online privacy on lockdown.
- Automatic Kill Switch. It’s another vital feature, blocking internet access to your device automatically even if the VPN connection fails. However, such cases are exceptionally rare with VeePN, as the service guarantees 99.9% connection stability. In contrast, using a free VPN app often results in sluggish connections due to a lack of servers.
- Double VPN. This feature adds an extra layer of security by encoding your private data twice, significantly reducing the chances of snoopers deciphering it. This robust encryption ensures that even if your information were intercepted, decoding it would take an impractical amount of time.
- No Logs Policy. While free VPN services may compromise your privacy by collecting and selling your private information, VeePN, as a paid service, adheres to a strict No Logs policy. This guarantees that your personal information remains confidential and won’t be leaked.
- Wireguard. Free VPNs inevitably decrease connection speed due to the necessity of data encryption, premium providers such as VeePN ensure that this slowdown is virtually imperceptible. This is achieved through the utilization of WireGuard®, the fastest VPN protocol available to date, making it well-suited for tasks like downloading large files and engaging in online gaming.
How to set up VeePN for securing your internet connection
Since VeePN is available on all platforms, setting it up on the device/operating system of your choice won’t be challenging. Feel free to scroll through to a platform you’re interested in:
PC
First things first, let’s dive into how to use VeePN on your desktop device, be it macOS or Windows.
MacOS
1. Sign up for VeePN and choose the pricing plan that suits your needs.
2. Get the VeePN app by downloading and installing it on your macOS device. You can find it on the App Store or the official VeePN website.
3. Open the VeePN app.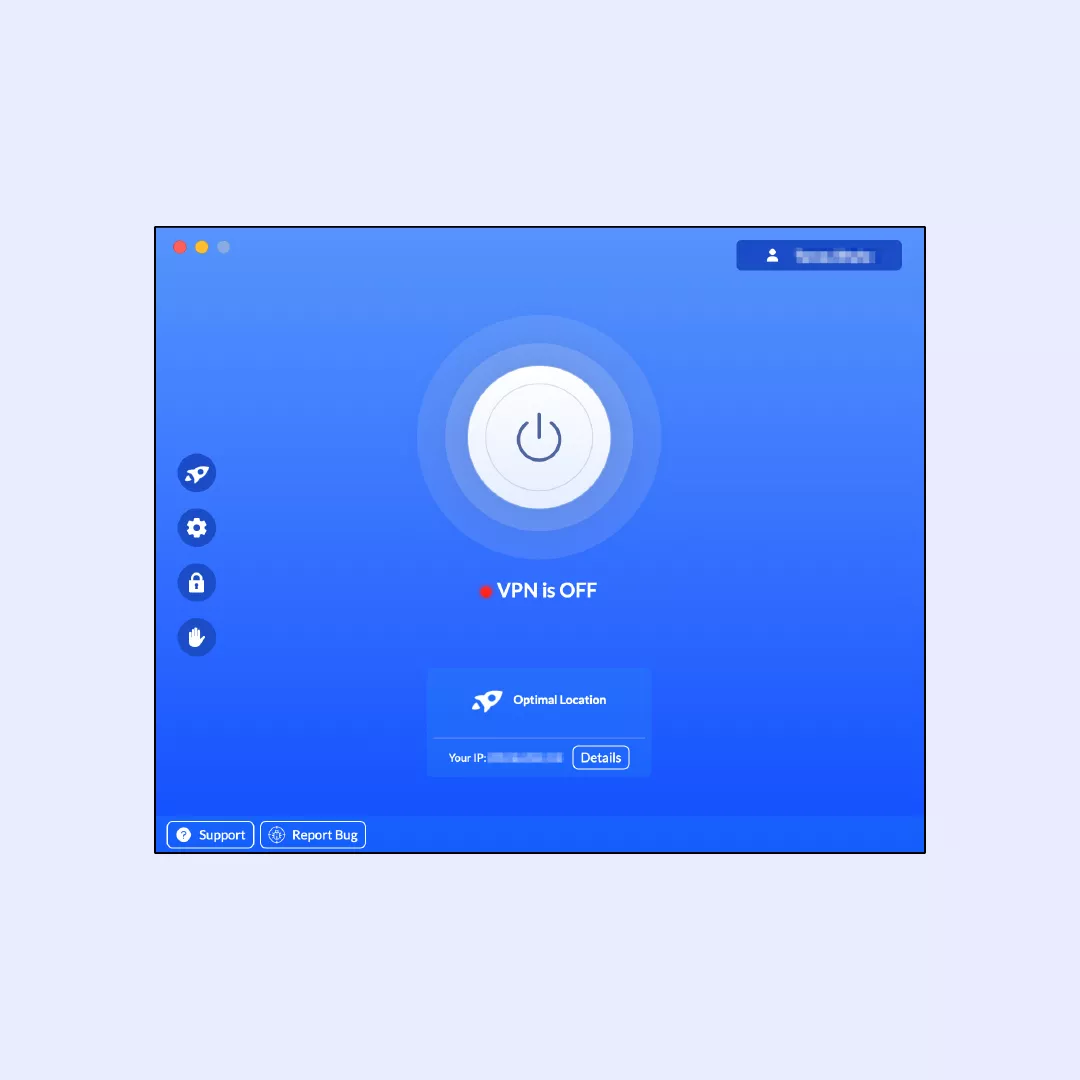
4. Choose a VPN server in the location you prefer. VeePN boasts 2500+ servers distributed across 89 locations covering 60 countries. You can also opt for the Optimal Location feature, which automatically connects you to the fastest VPN server.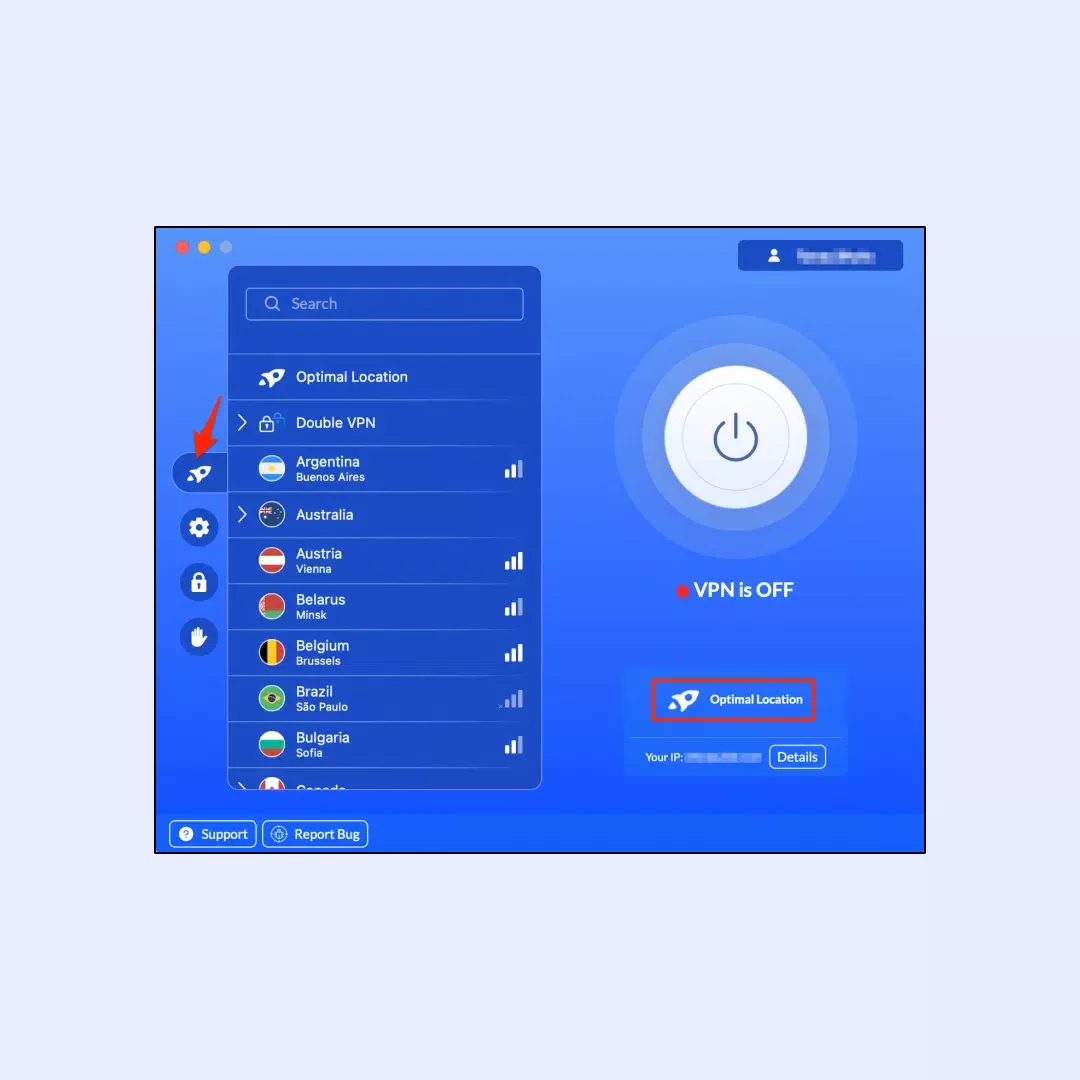
5. Flip that VPN switch and turn it on!
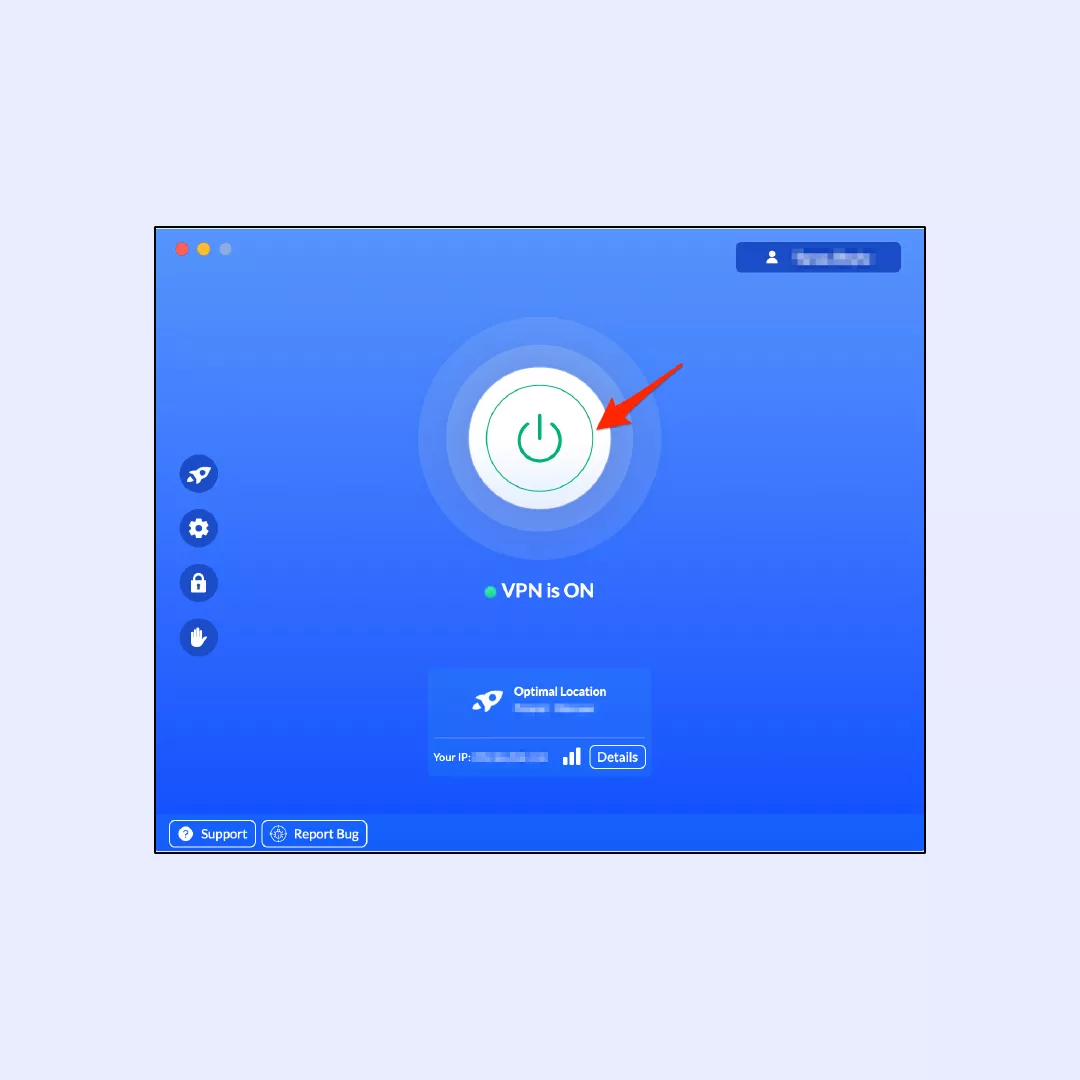
Easy peasy! Now you’re all set to surf securely with VeePN on your macOS device.
Windows
Let’s get you started with VeePN on your PC:
1. Create a VeePN account and select the pricing plan that suits you best.
2. Head over to the official website, download the app, and install it on your PC.
3. If you’re using an Android device, download the VeePN APK file from the official website.
4. Launch the VeePN application and choose your preferred server location, or simply go for the Optimal Location option.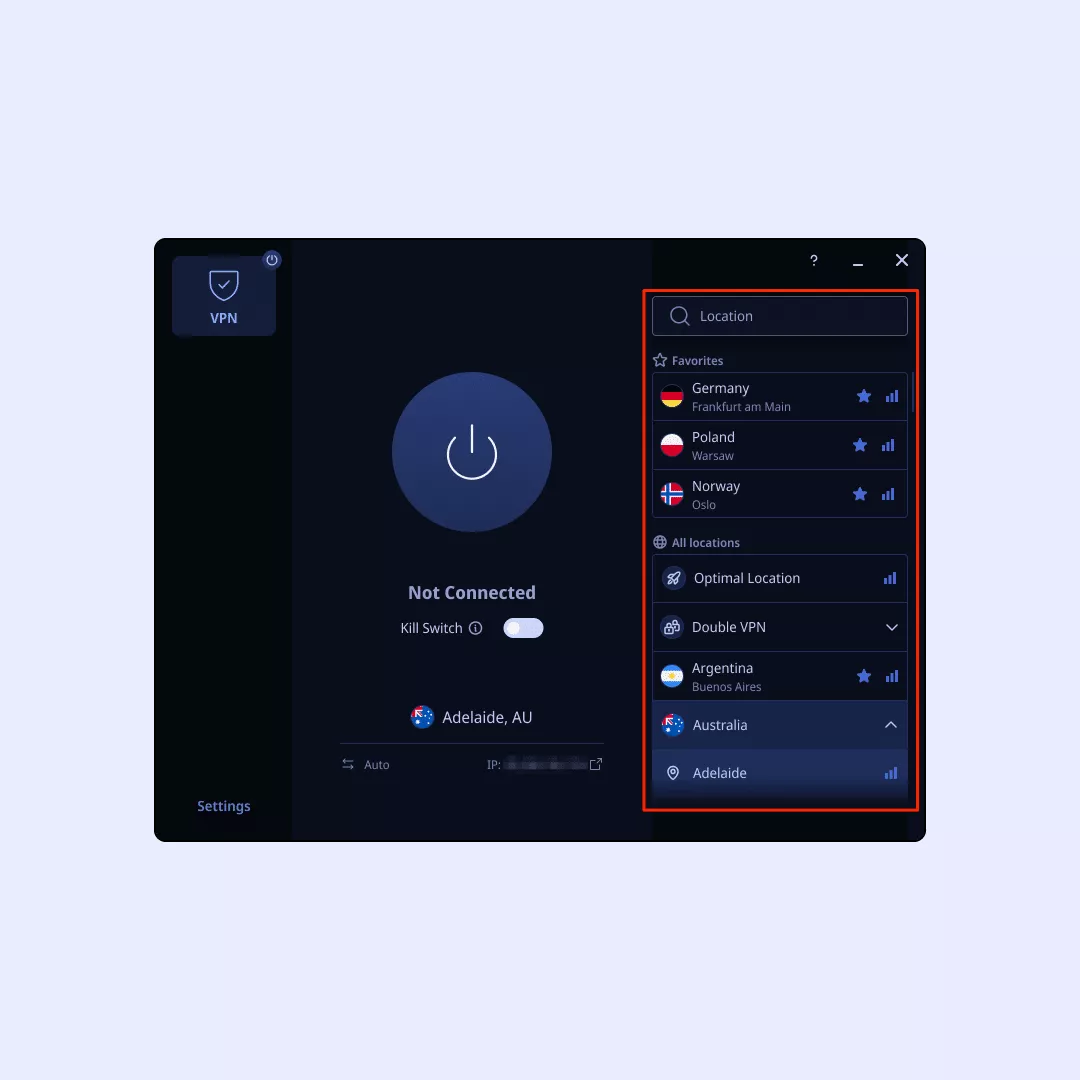
5. Toggle that VPN switch to turn it on.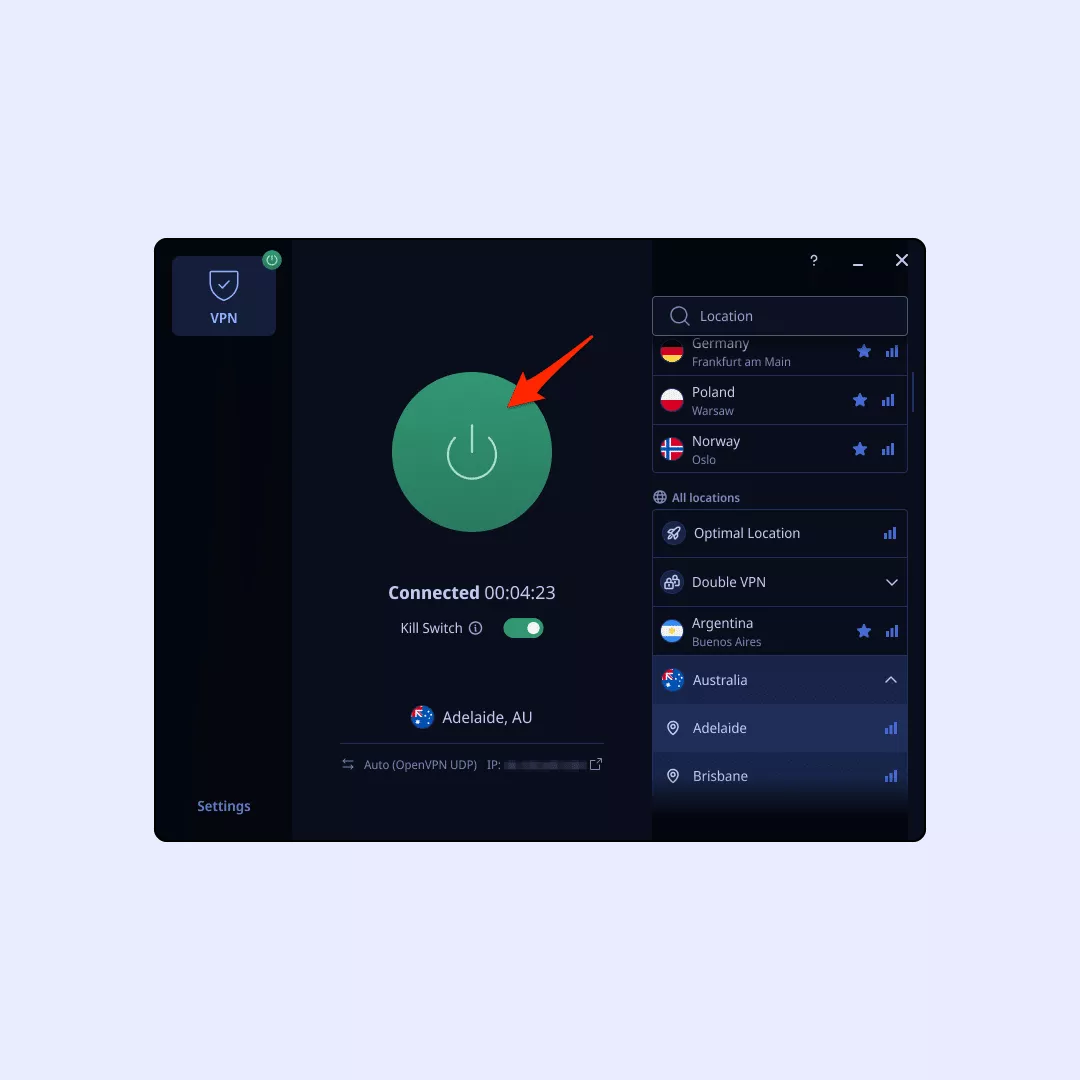
And there you have it! You’re all set to go with VeePN on your Windows PC. Happy browsing!
Tablet and smartphone
Let’s get VeePN up and running on your mobile phone or tablet, whether it’s iOS or Android.
iOS
Note: Make sure your iOS is version 10 or higher.
1. Launch Safari or your preferred browser and head to the VeePN website.
2. Sign up for a VeePN account.
3. Grab the VeePN app from the App Store and install it on your iOS device.
4. Open up the VeePN app on your iPhone.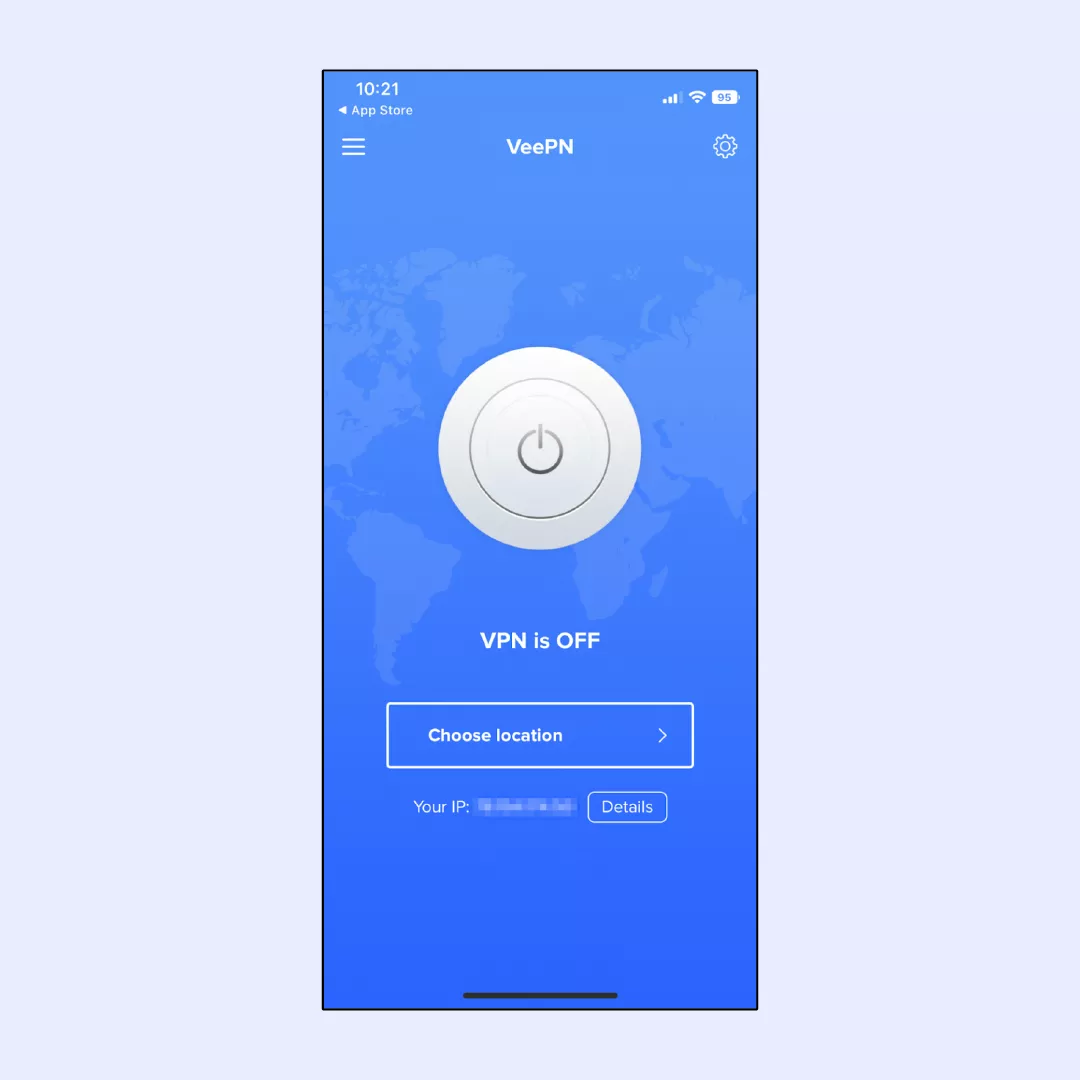
5. Choose the server location that suits you best.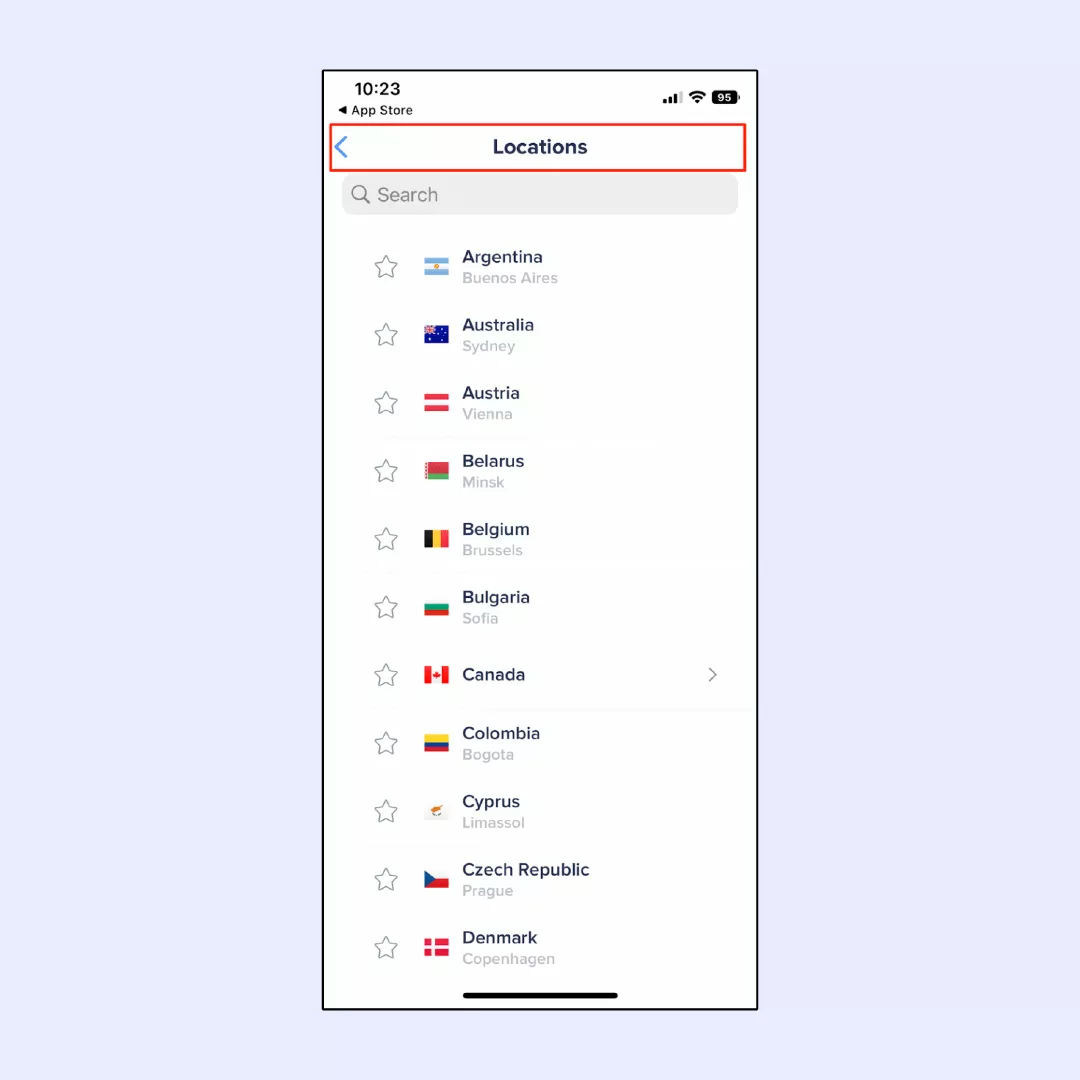
6. Allow the VeePN app to add VPN configurations to your iPhone or iPad.
7. Toggle that VPN switch and turn it on.
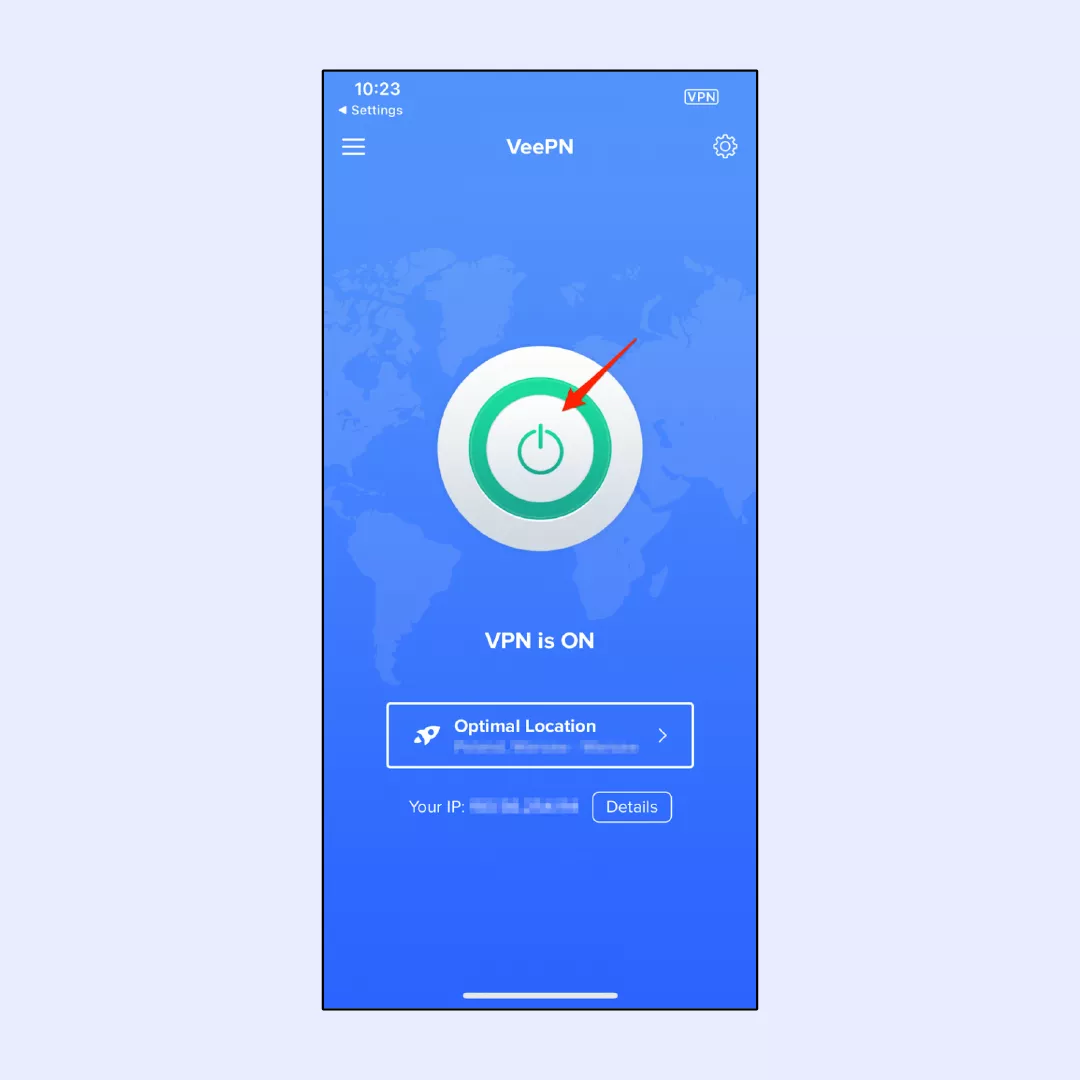
For more in-depth details, you can refer to our comprehensive guide on setting up a VPN on your iPhone.
Android
Let’s walk you through setting up VeePN on your Android device:
Note: VeePN is compatible with Android versions 13, 12, 11, 10, Pie, Oreo, and Nougat.
1. Start your preferred browser and go to the official VeePN website.
2. Create a new account and pick the subscription plan that suits your needs.
3. Grab the installation file either from the Play Store or directly from the website in the form of an .apk file.
4. Install the app, then open it up and log in to your account.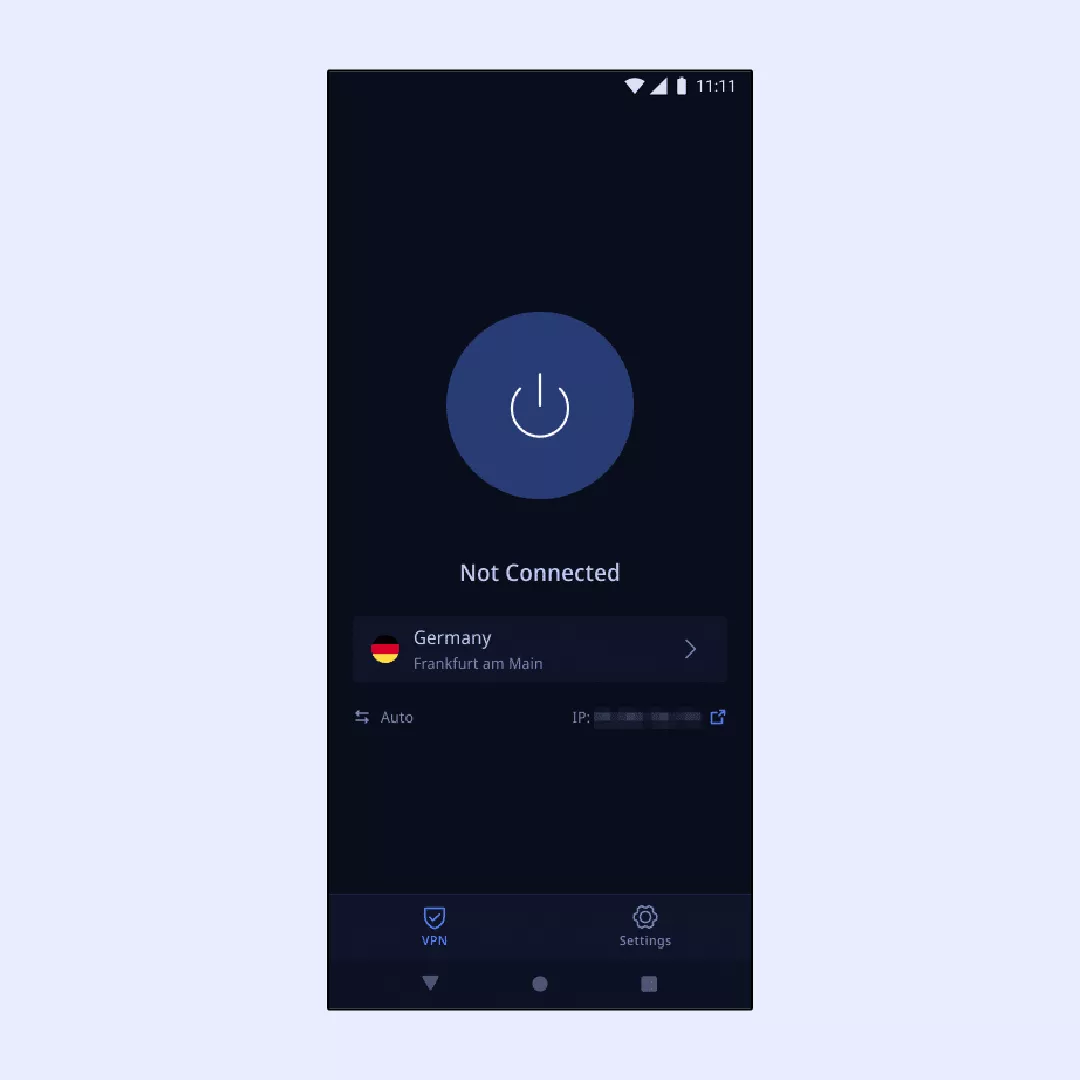
5. Within the VeePN app on your Android device, select the optimal server location.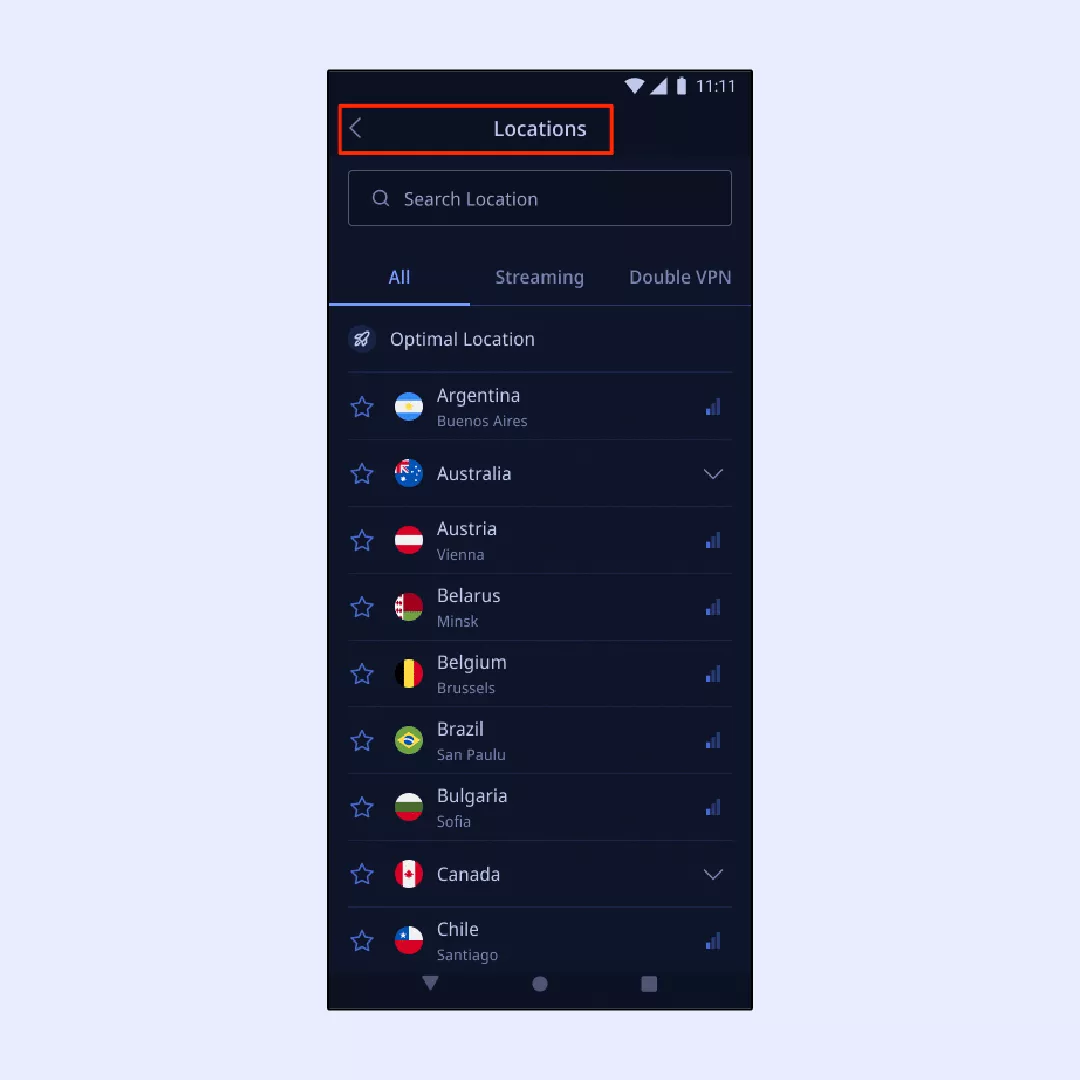
6. Allow the VeePN app to add those crucial VPN configurations to your device.
7. Hit the VPN switch and turn it on.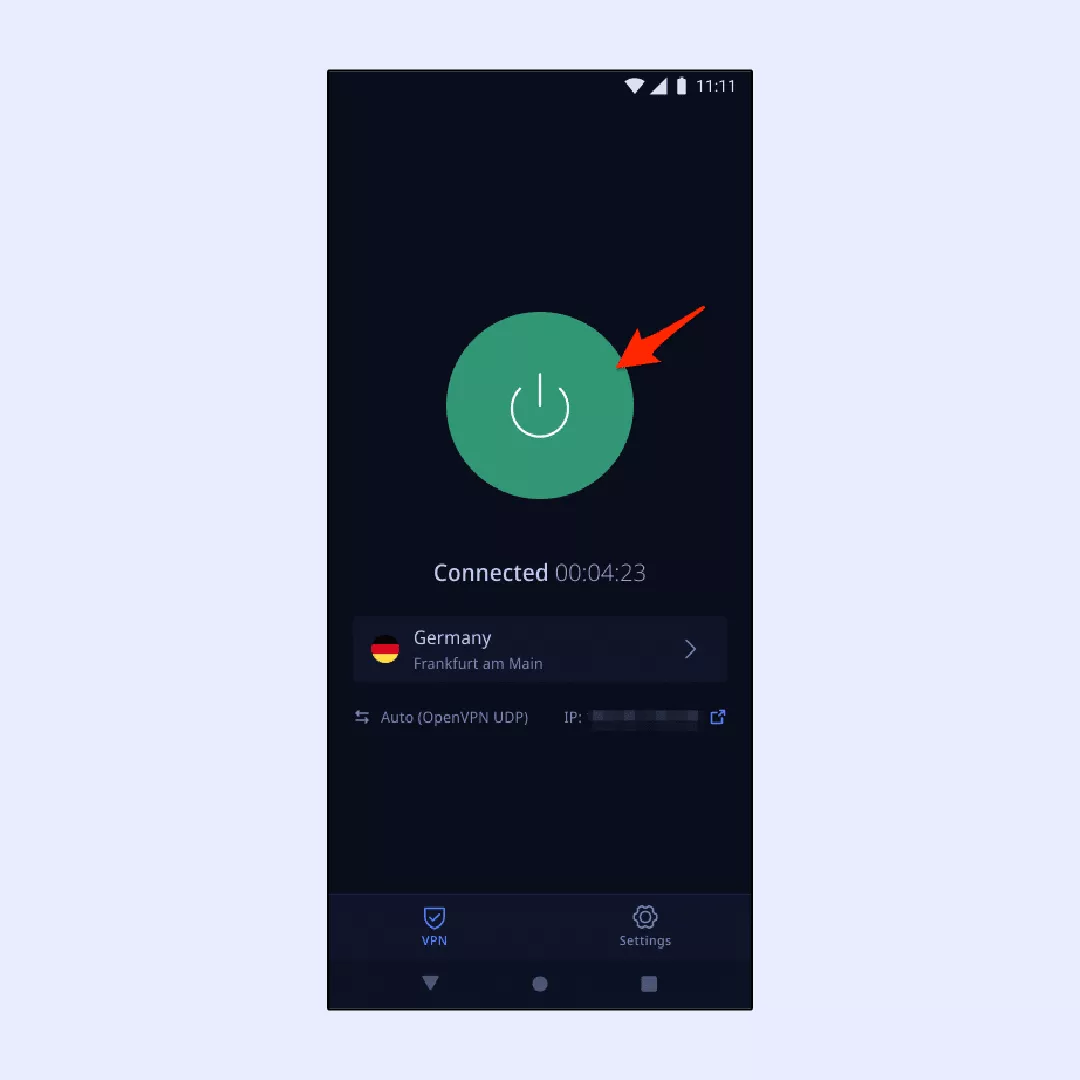
For more nitty-gritty details, feel free to dive into our guide on setting up a VPN on your Android.
Browser extension
VeePN browser extension is compatible with Google Chrome, Mozilla Firefox, and Microsoft Edge web browsers. This extension offers an optimized version of the client app, operating exclusively within a single browser and granting access to a limited selection of servers. For a more in-depth understanding, explore our article discussing the differences between a full VPN app and an extension.
To set up the VeePN extension, follow these steps, demonstrated here on Chrome. Similar procedure can be applied for Firefox or Edge.
1. Open your preferred web browser.
2. Locate the VeePN extension for Chrome either in the Extensions settings at the top right corner of your screen or use this link to add it directly to your browser.
3. Choose “Add to Chrome,” then click “Add extension.”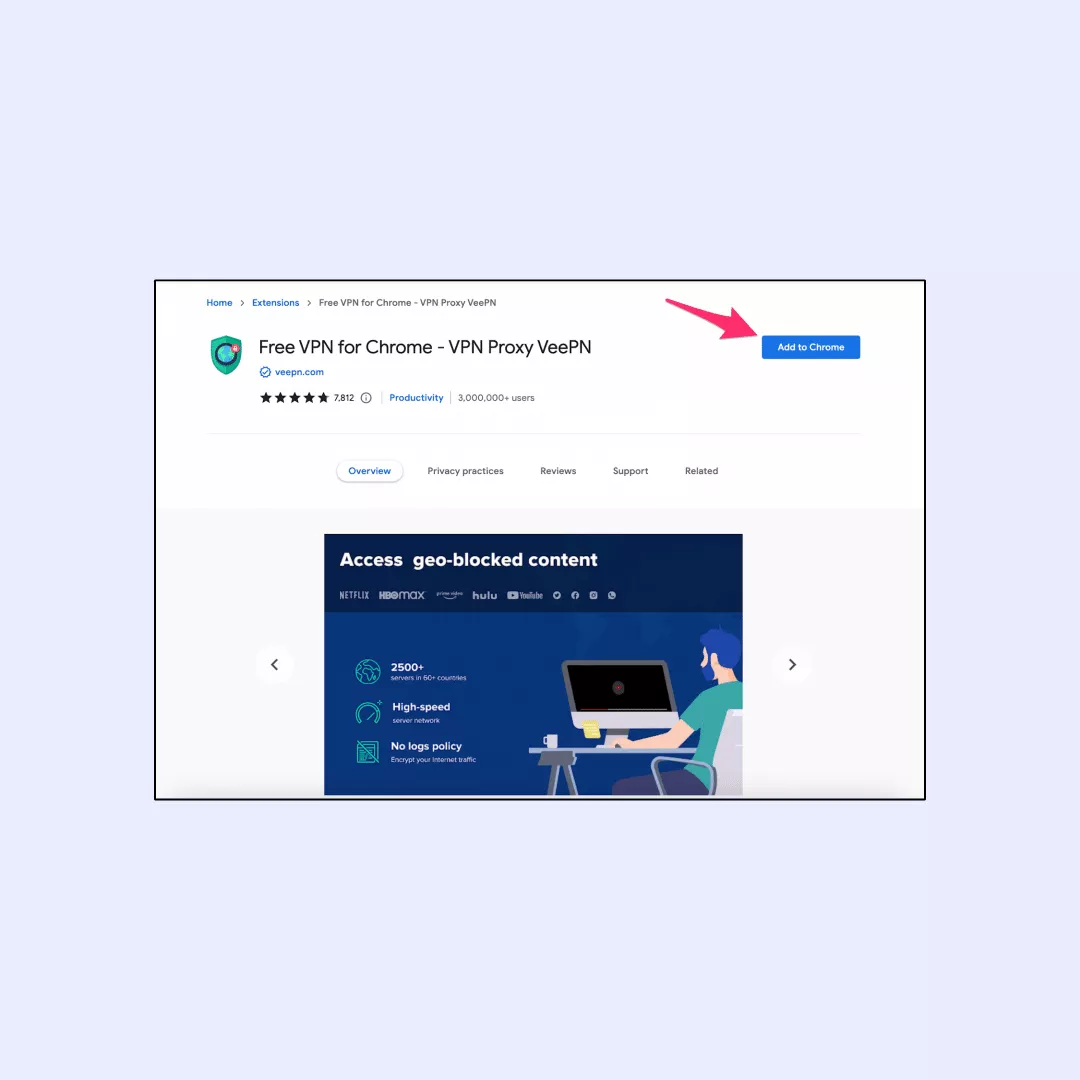
4. Return to your Extensions settings and select VeePN.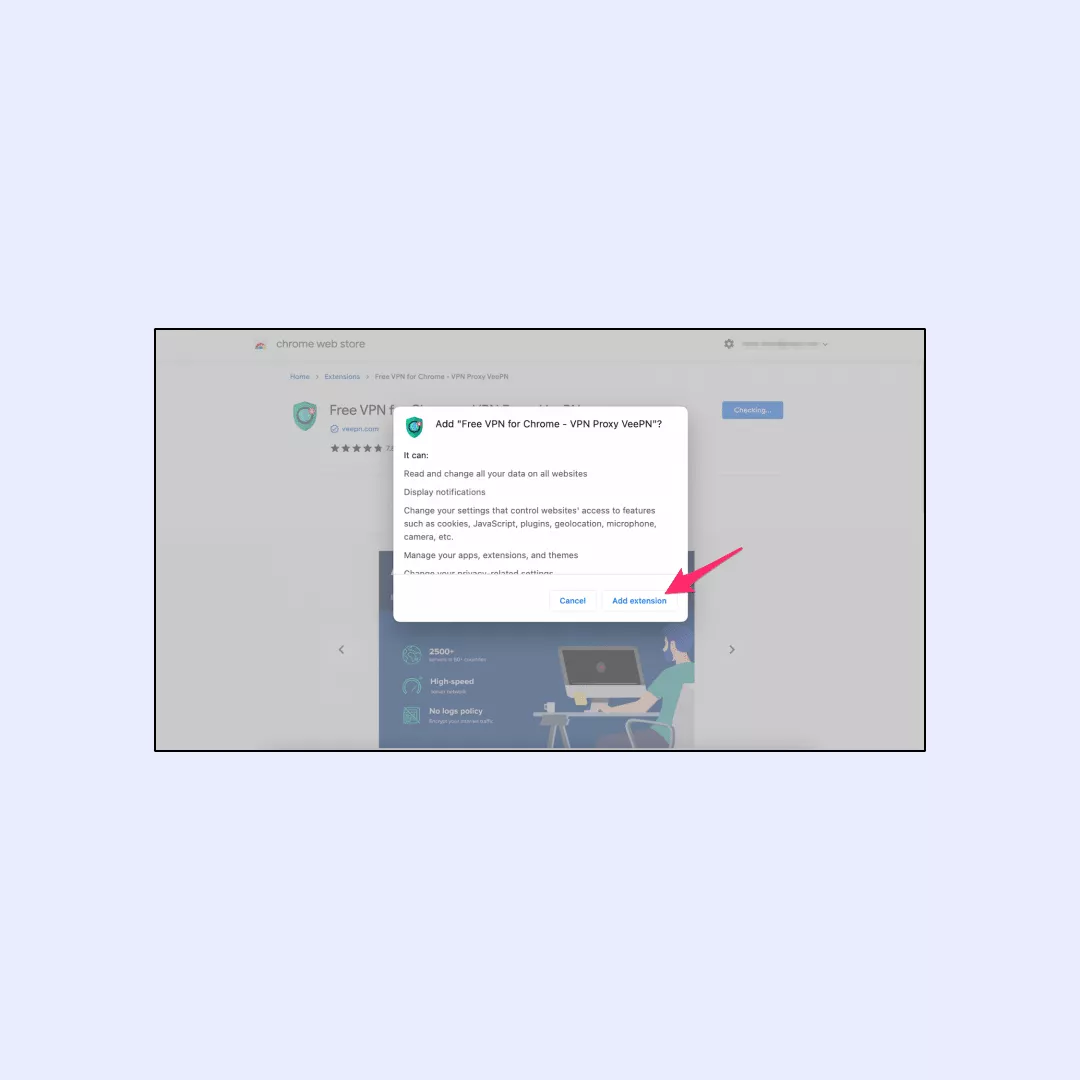
5. From the browser extensions menu, opt for your preferred server.
6. Select your desired VPN location.
7. Activate your VPN by toggling the switch.
Now you’re jet-set! Feel free to use these steps for Firefox or Edge.
Safeguard your data with VeePN
Changing the download location in your preferred browser can be learned with no hassle. But downloading files from the internet is always a run on a razor blade, unless you use a reliable VPN solution.
VeePN is just what you need to defend your private data and devices from the filthy hands of hackers, fraudsters, and greedy advertising agencies. In addition to security features we’ve described in this article, you should keep in mind that VeePN also offers NetGuard — an antimalware app that protects your browser from malicious files and annoying ads popping up in your browser’s window. On top of that, a VeePN subscription guarantees you access to antivirus software that will keep an eye on the data security stored on your devices.
Check VeePN pricing right now to pick a subscription that suits you best and use it for up to 10 devices simultaneously.
How to Change Download Locations
To change the download location in Chrome, follow these steps:
- Open Google Chrome and click on the three vertical dots in the top-right corner to open the menu.
- Select “Settings” from the menu, and then scroll down and click on “Advanced” to reveal additional settings.
- Under the “Downloads” section, you’ll find the option to “Location.” Click on “Change” next to it, and choose the desired folder or create a new one. Once selected, confirm the change, and Chrome will use the newly specified location for future downloads.
To change the download location in Firefox, follow these steps:
- Open Mozilla Firefox and click on the three horizontal lines in the top-right corner to open the menu.
- Select “Options” or “Preferences” from the menu, depending on your operating system.
- In the left sidebar, click on “General.” Under the “Downloads” section, you’ll find the option to “Save files to.” Click on the “Browse” button next to it, choose the desired folder, and click “Select Folder.”
- Close the Options/Preferences tab. Firefox will now use the newly specified location for saving downloaded files.
To change the download location in Microsoft Edge, follow these steps:
- Open Microsoft Edge and click on the three horizontal dots in the top-right corner to open the menu.
- Select “Settings” from the menu.
- Scroll down and click on “View advanced settings.”
- Under the “Downloads” section, you’ll find the option to “Change.” Click on it, choose the desired folder for your downloads, and click “Select Folder.”
- Close the Settings tab. Microsoft Edge will now use the newly specified location for saving downloaded files.
To change the download location in Opera, follow these steps:
- Open Opera and click on the Opera icon in the top-left corner of the browser to open the menu.
- Select “Settings” from the menu and then click on “Advanced” in the left sidebar.
- Under the “Downloads” section, you’ll find the option to “Download location.” Click on “Change” and choose the desired folder for your downloads. Click “Select Folder” to confirm.
- Close the Settings tab. Opera will now use the newly specified location for saving downloaded files.
To download files safely, use reputable sources and official websites, and consider using a reliable antivirus software to scan downloaded files for potential threats before opening them. Additionally, consider using a reliable virtual private network like VeePN for an extra layer of security while downloading files from the web.
VeePN is freedom
Download VeePN Client for All Platforms
Enjoy a smooth VPN experience anywhere, anytime. No matter the device you have — phone or laptop, tablet or router — VeePN’s next-gen data protection and ultra-fast speeds will cover all of them.
Download for PC Download for Mac IOS and Android App
Want secure browsing while reading this?
See the difference for yourself - Try VeePN PRO for 3-days for $1, no risk, no pressure.
Start My $1 TrialThen VeePN PRO 1-year plan



Thanks!
Hi Jing, thank you so much for the step by step guide.
Can someone tell me that, the changing in the downloading location in Firefox does it have any impact on the downloading process? Sometimes I contemplate on sorting my files to make it easier to find them but it sounds time-consuming.