Clear Cache on Mac: Elevate Your Device’s Speed and Performance
Is your Mac feeling a bit sluggish when you’re in a hurry to get things done? Well, don’t fret because it’s time for some digital TLC (tender loving care). After all, we all care about our devices, right? The good news is that this is not rocket science and is more of a regular check up. In this blog post, we’ll take you step by step on how to clear cache and cookies on Mac to let it zip by like never before. Buckle up because we’re going to rev up your Mac’s engines! Okay, so now no more verbiage, let’s just get down to business.

What is cache?
Before we get to the nitty-gritty let’s cover the basics of what a cache is:
Cached files are similar to digital shortcuts that your computer takes for faster launching of apps and programs in the future. Instead of fetching the data again and again, it is your computer fetching the data from these shortcuts.
There are three primary types of cache:
- Browser cache: Stores web content like images and videos for faster webpage loading.
- Application cache: Boosts app performance by storing frequently accessed data from user apps, including third-party software and Apple apps.
- System cache: Stores frequently used system data and enhances overall system speed and performance.
How to clear cache and cookies on Mac
Clearing your Mac’s cache can give your Mac a much needed speed boost by clearing out temporary files that are accumulated over time. There are a number of ways how to clear cache on a Mac:
- Manual cache clearing:
- Browser cache (Safari, Chrome, Firefox)
- App cache
- System cache
- Using built-in utilities
- Third-party cache cleaning apps
- macOS updates
Let’s go over each way step-by-step.
How to clear browser cache on MacBook & other Mac products
No matter which browser you are using, clearing the browser cache on Mac is pretty easy. Just remember that your cache begins to build up again the moment that you start browsing again.
To clear your browser cache on Mac:
- Open Finder.
- Launch Go to Folder using the Shift + Command + G shortcut.
- Type ~/Library/Caches and hit Return.
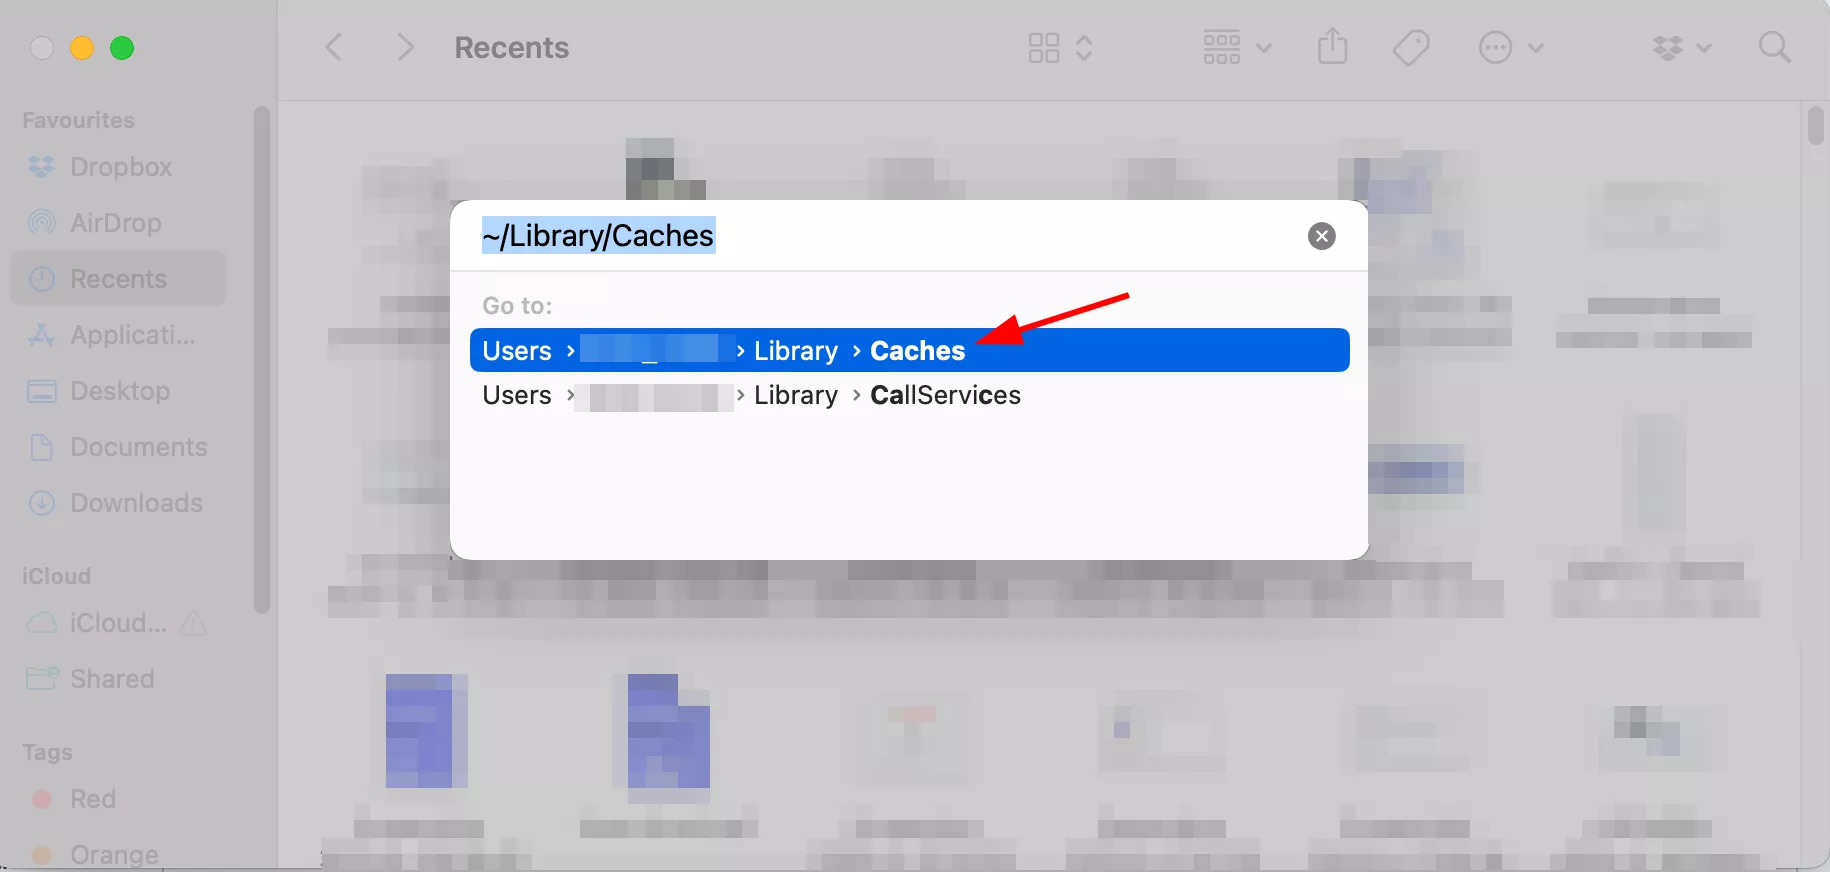
- Look for the browser cache folders (for example, Safari or Chrome).
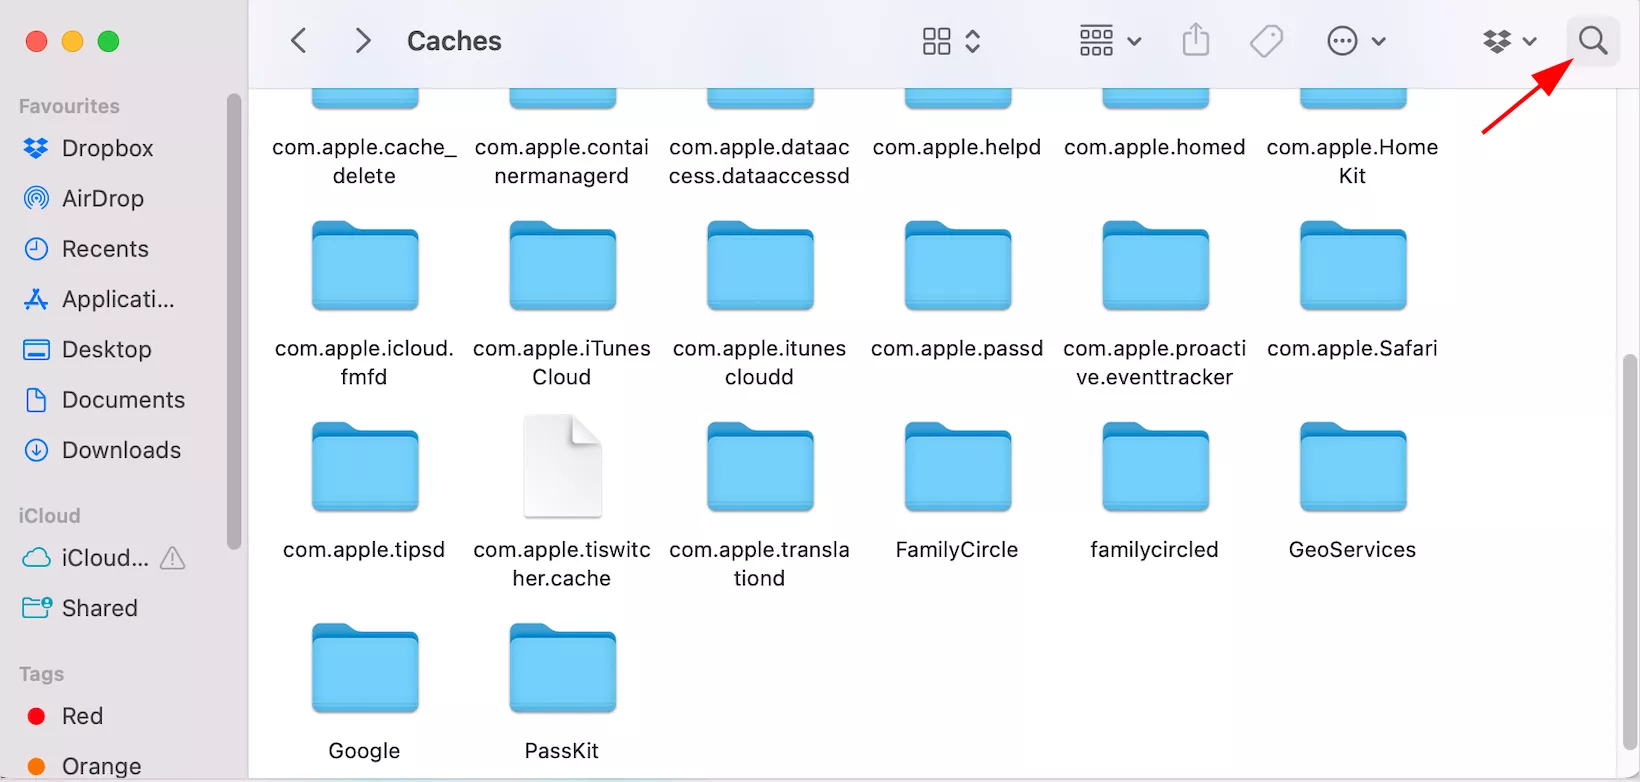
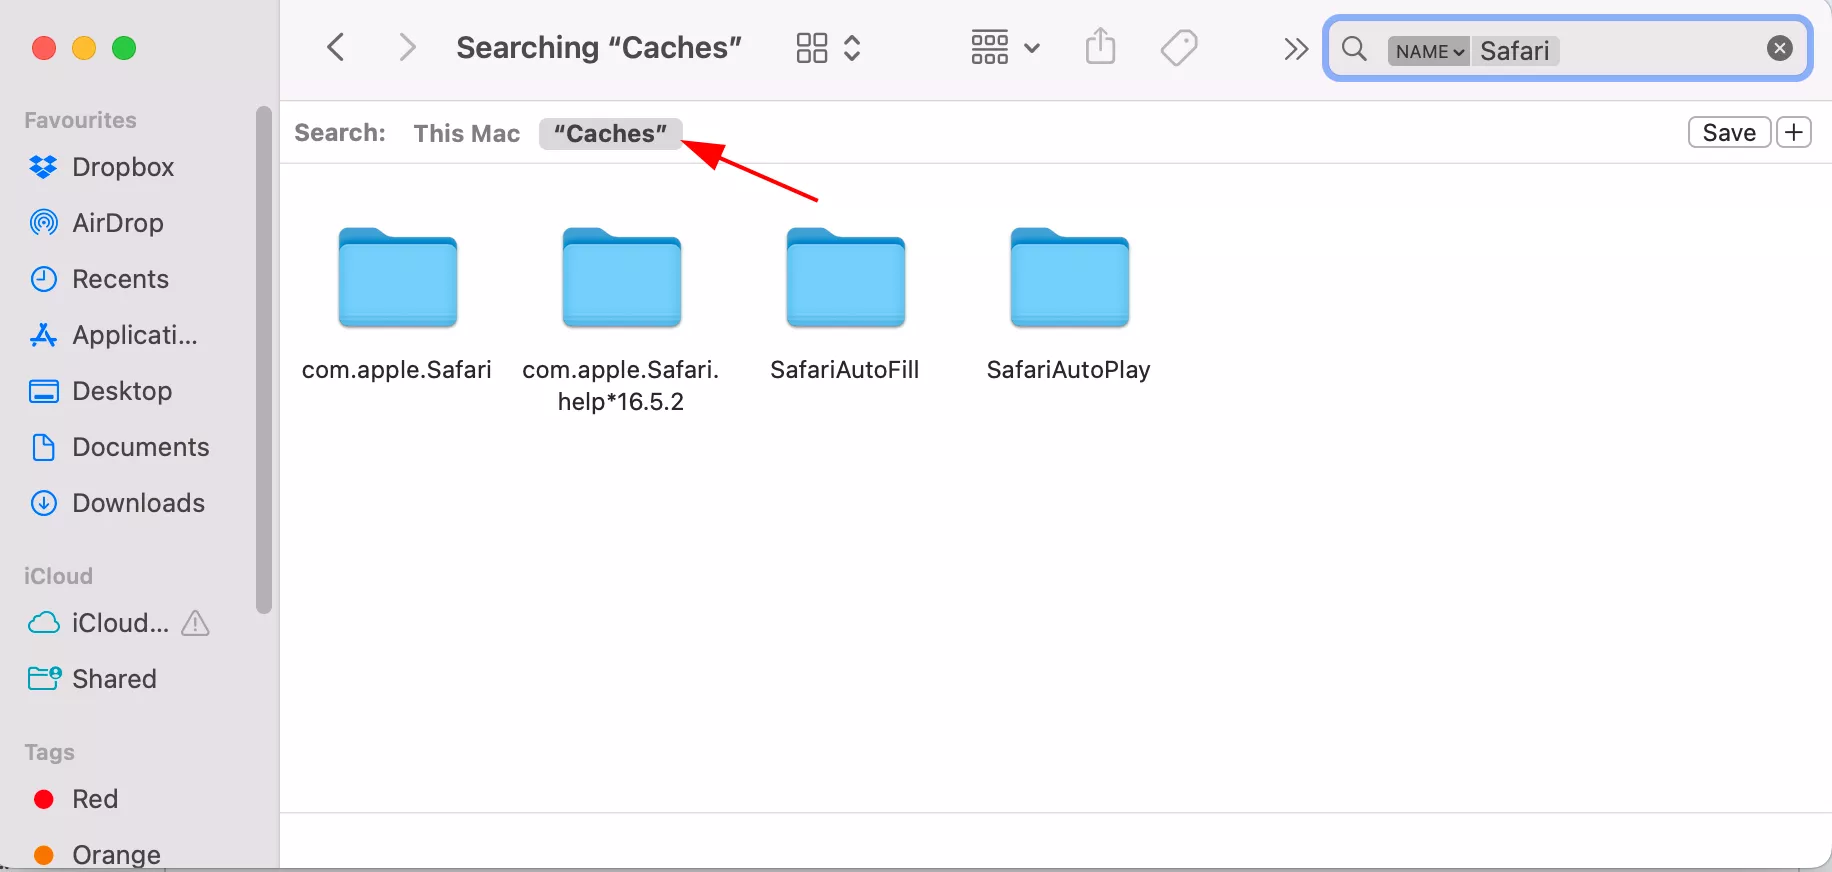
- To speed up the process, click the Magnifier icon and type your browser’s name.
- Make sure to click Caches.
- Select the files you want to clear.
- Hit Delete.
All done!
For a detailed tutorial on how to clear cache in a specific browsers, check out the steps below.
How to clear cache in Safari Mac
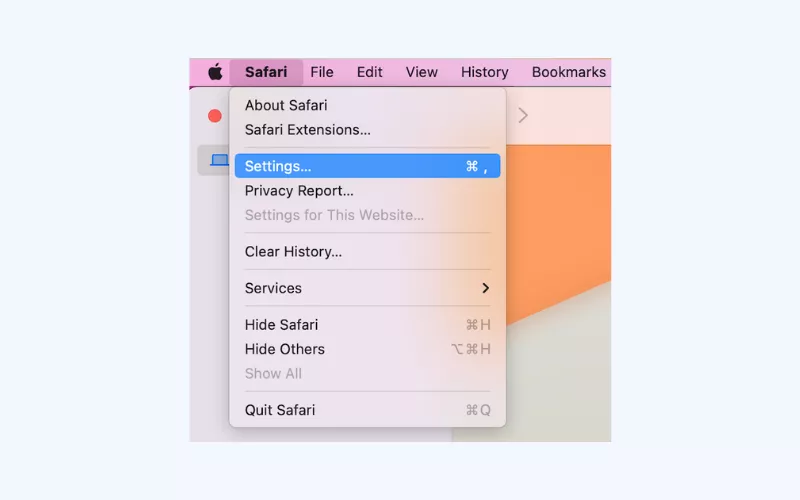
- In the top menu, click on Safari and select Settings.
- Go to the Privacy tab.
- Click on Manage Website Data.
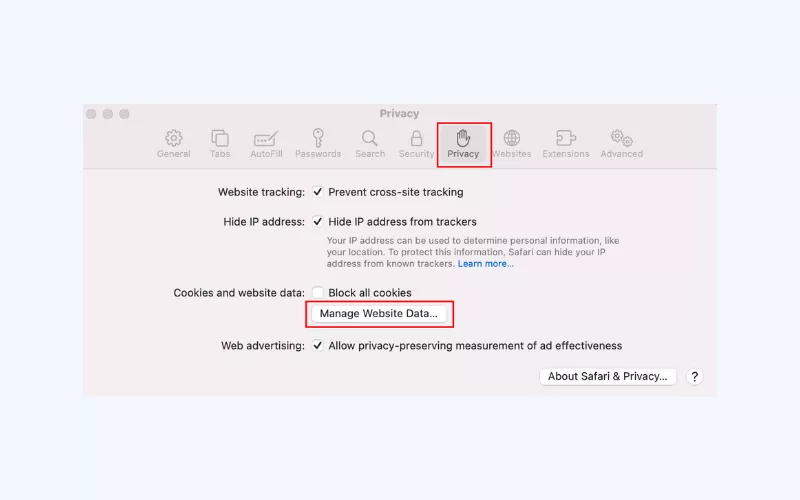
- You’ll see a list of websites with stored data. Click Remove All to clear all cache data or select specific websites and click Remove for each.

- Confirm the action when prompted.

Another way is to do so via the Develop menu.
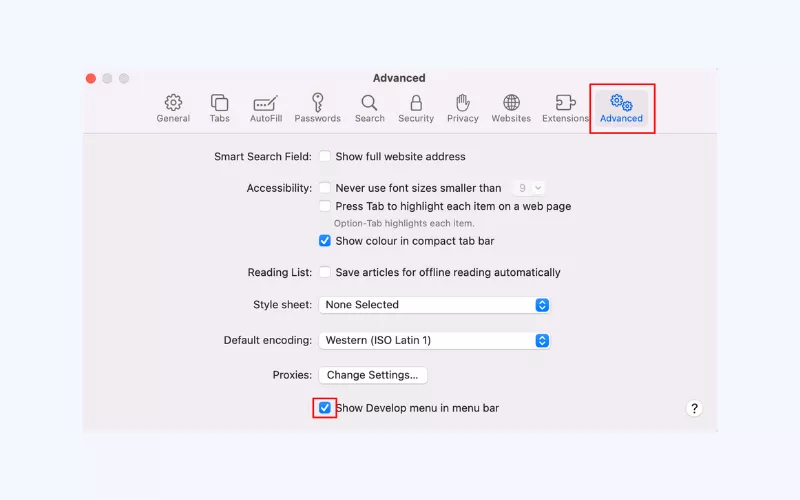
- Open Safari and click on Settings in the Safari drop down.
- Select Advanced and tick the Show Develop menu in menu bar box at the bottom.
- Select the Develop menu above and click Empty caches.
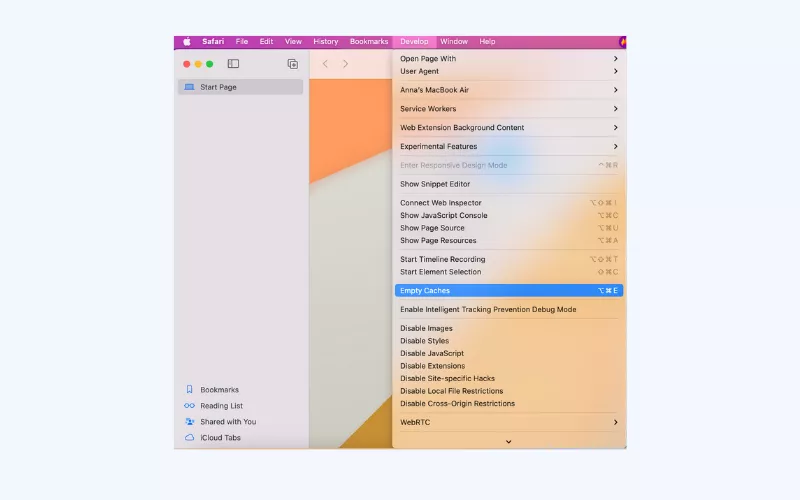
From then on, you can just hit Command + Option + E and your Safari browser cache will clear automatically.
Now, as to other browser, the process is pretty similar.
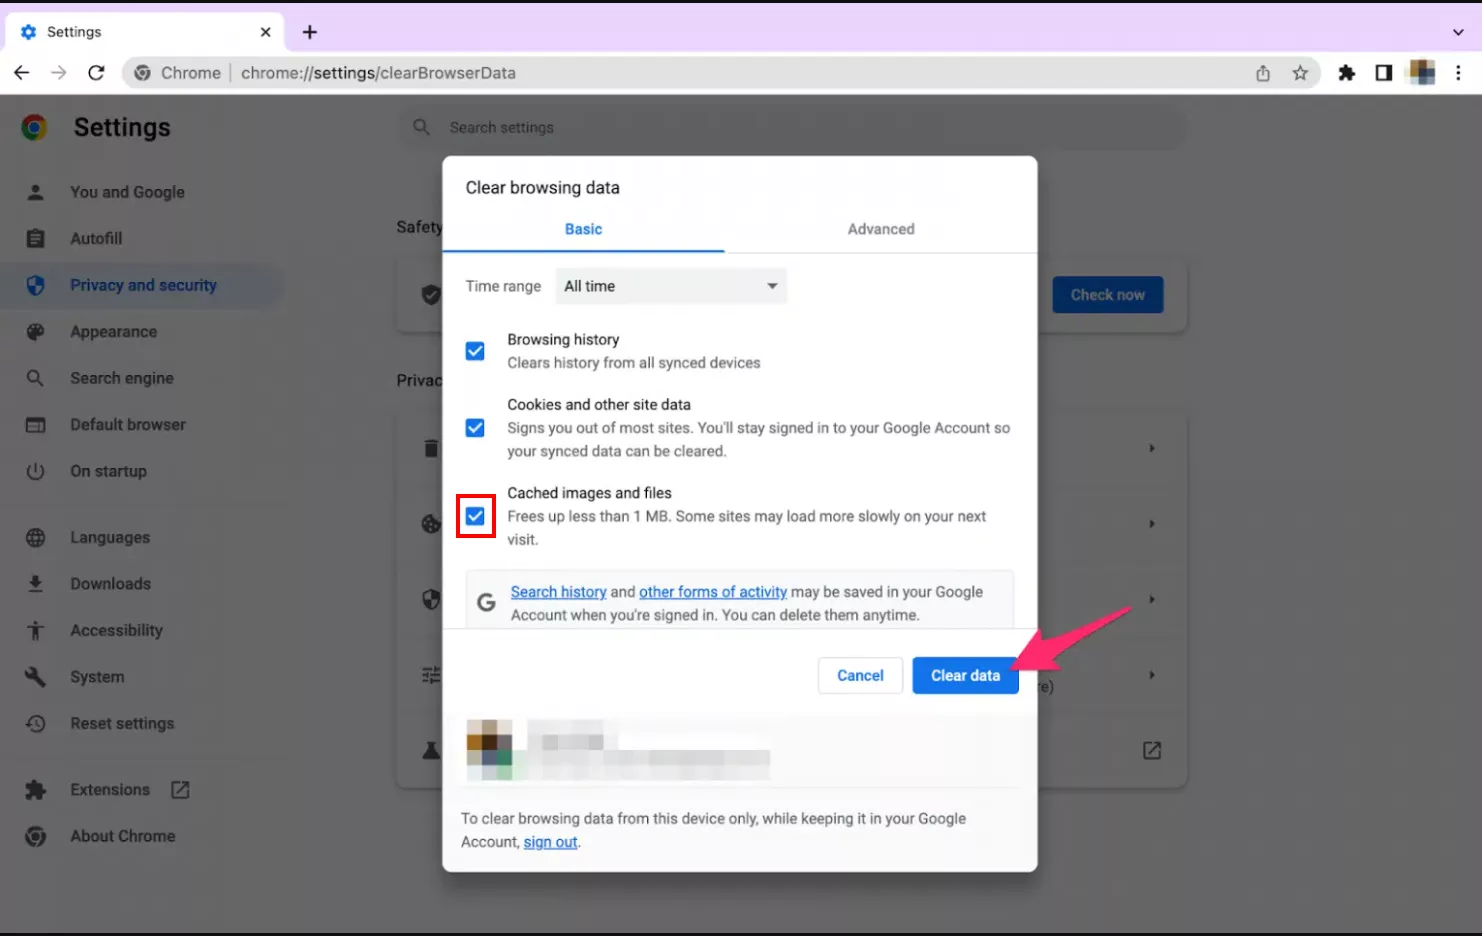
How to clear browser cache in Chrome
- In the top-right corner, click on the three vertical dots to open the menu and select Settings.
- On the left, select Security and privacy > Clear browsing data to delete browsing data that has built up over time.
- Choose the time range for which you want to clear data (“Last hour,” “Last 24 hours,” “All time”).
- Select the types of data to clear, including Cached images and files and cookies and other site data.
- Click Clear data to confirm.
How to clear browser cache in Firefox
- Click on the three horizontal lines at the top right corner of the screen and go to the History section.
- Select Clear recent history.
- Choose the amount of history you want to clear in the Time range to clear drop-down menu.
- Enable the Cache box. You may also choose other types of data if necessary.
- Click OK.
How to clear browser cache in Edge
- Click on the three dots menu at the top right corner of your screen and select Settings.
- Head to the Privacy, search, and services section.
- Find the Clear browsing data section and click Choose What to Clear.
- Select the time range for clearing your browsing history.
- Enable the Cached images and files box, as well as other boxes for data you would like to delete.
- Click Clear now.
How to clear app cache on Mac
Just like browsers, apps produce their own cache for access of data quickly. Clearing app caches may assist in resolving app problems and also make your Mac faster.
Note: Developers sometimes store essential files in app caches. So, it is important that you back up your cache folders before you erase its contents. If your app runs ok after the caches have been deleted then you can remove the backup too.
Remember that universal method to clear browser cache? Things are similar here. So, here’s how to clear app caches on your Mac:
- Open Finder.
- Launch Go to Folder using the Shift + Command + G shortcut.
- Type ~/Library/Caches and hit Return.
- Find the cache folders related to your apps.
- Select the cache files that are in these folders and delete them.
- You can also empty the trash to permanently delete the cache files.
How to clear system cache on Mac
Now, let’s take a broader look at cache clearing process, that is, the cache generated by the system — your macOS.
When removing the system cache, proceed with caution. Why? Well, the Mac’s system cache acts like a memory bridge connecting the main memory and the processor. It helps the CPU (central processing unit or the brain of your computer) fetch data quickly, without the tedious bit-by-bit loading.
A good rule of thumb is to back your files, delete individual files, and preserve the folders in which they were created. Here’s how.
- Back up your data.
- Before continuing, make sure that you have made a full backup of your important data on your Mac. In fact, use Time Machine or another dependable means of backing up your files and system.
- Locate system cache files.
- Open Finder.
- Launch Go to Folder using the Shift + Command + G shortcut.
- Type ~/Library/Caches and hit Return.
- Browse through the com.apple folders you see.
- Delete сache files.
- Select individual files you want to remove and move them to the Bin. Remember, it’s better to delete individual files but preserve the folders.
- Empty Bin.
- Empty Bin to free up storage space.
Other ways to clear cache on Mac
- Using built-in utilities:
- Disk Utility: You can use Disk Utility to find and repair disk errors which can also delete corrupt files.
- Click Launchpad in the Dock.
- In the search field type Disk Utility and then click on Disk Utility icon.
- Select your startup disk, and click First Aid.
- Click Run to start the process.
- Disk Utility: You can use Disk Utility to find and repair disk errors which can also delete corrupt files.
- Third-party cache cleaning apps:
There are different third-party apps that are meant to assist you in clearing cache on your Mac. Some of the popular ones are CleanMyMac or CCleaner. - macOS Updates:
- Regularly updating your macOS to the latest version can help clear out obsolete cache files, refresh parts of your DNS cache, and optimize system performance.
So now that we’ve covered the practical steps, how about delving into some cache basics and digital security tips? Don’t worry; it won’t be a snooze-fest.
Is clearing cache on Mac necessary?
In most cases, it is a good practice to clear cache on your mac. Cache files are able to build up and consume disk space and even lead to privacy problems. But, take care when dealing with system and app cache. Always to back up your files, delete individual files instead of entire folders.
What does clearing cache do?
Think about every website you’ve ever visited – that’s a lot of cached files, images and videos occupying space on your computer. If you have never cleared your caches then you could have gigabytes of unnecessary system files filling up your space. Regularly clearing caches declutters your Mac and makes it more responsive, and it is a common troubleshooting step even for web developers when websites do not load correctly.
So, clearing your cache serves several purposes:
- Freeing up space: Removes unnecessary data, creating more disk space.
- Privacy: Clears personal data stored by websites and apps, enhancing your privacy.
- Content update: Refreshes browser content to display the latest versions.
- App performance: Helps troubleshoot app issues, leading to smoother operation.
If not deleted, cache files may accumulate rapidly and cause some privacy-related problems. So, it’s better that you get rid of them to ensure that you have your privacy and as a bonus, some more space might open up.
Speaking of privacy, how about some more Internet safety tips?
Keep your Mac safe with these 5 easy tips
1. Use a VPN for secure connection
✅ A reliable VPN provider will encrypt your data and change your online location. Try to use a VPN for Mac to boost your online security.
When you are on the Internet, data will go both in and out, and people such as hackers, your Internet provider, and others can intercept this data. A VPN is like a secret tunnel, which protects your secret information like financial data, emails, browsing history, etc.
Try VeePN risk-free to make sure your online activities are as they should be – private.
2. Check website’s reliability
✅ Look for the padlock icon in the URL bar and check if the website’s address starts with “https.”
Avoid online scams by verifying websites by balking their privacy policies, contact information, user reviews and with website reputation tools, like Norton Safe Web or Google Safe Browsing.
3. Keep sensitive data offline
✅ Or make sure to encrypt your sensitive data with a VPN if you do have to share it.
To reduce the risks on the internet it is better to keep sensitive information off the web in a secure place, like a locked cabinet or USB stick.
4. Get an antivirus to protect from viruses
✅ Along with a VPN, boost your cybersecurity arsenal with a reliable antivirus.
Antivirus software can be used to help protect your computer from malware and viruses. You should also make sure to install a good antivirus program and have the latest antivirus updates.
If your device arsenal isn’t secluded to Mac only, you can protect your other devices from malware with VeePN Antivirus. It’s available for Android & Windows and lets you scan files in real-time and run quick and full security scans.
5. Update your software regularly
✅ Regular software updates bring vital security patches and bug fixes
In 2020 outdated software was the second most popular cause for data breach. To keep safe online always keep your software and apps up to date. Also, consider turning on automatic updates in your device settings, if possible
To enable automatic software updates for your macOS:
- Go to System Settings.
- Choose General > Software Update.
- Select On for Automatic updates.
And that’s a wrap! Show your device some much-needed love and care – enhance your online security and shield yourself from potential threats. With regular cache clearing and the proper cybersecurity measures in play, your Mac should be cruising along without a hitch.
FAQ: Clear Cache on Mac
Yes, clearing cache on Mac is generally necessary as cache files can pile up, consume disk space, and raise privacy concerns. However, exercise caution when dealing with system and app caches. Check out our post for the correct way to clear system and app caches.
VeePN is freedom
Download VeePN Client for All Platforms
Enjoy a smooth VPN experience anywhere, anytime. No matter the device you have — phone or laptop, tablet or router — VeePN’s next-gen data protection and ultra-fast speeds will cover all of them.
Download for PC Download for Mac IOS and Android App
Want secure browsing while reading this?
See the difference for yourself - Try VeePN PRO for 3-days for $1, no risk, no pressure.
Start My $1 TrialThen VeePN PRO 1-year plan
