How to Set Up a VPN on Linux: A Step-By-Step Tutorial
Unfortunately, Linux often lacks support and app availability. Many services and apps tend to cater to Windows and Mac users, leaving Linux users out. This is a common issue with VPN providers, too. Fear not, as in this guide we’ll walk you step-by-step on how to install a VPN for Linux OS without a native app. We’ll also explore why using a virtual private network (VPN) on Linux is a smart move in the first place.

The easiest way to set up a VPN on Linux
Setting up a VPN on Linux operating system, regardless of your distro or VPN provider, is surprisingly straightforward, even without an official Linux app.
Let’s kick things off with the simplest option: using your VPN provider’s browser add-on. Often, when a VPN provider lacks a standalone VPN app for Linux , they provide an add-on (extension) tailored for popular browsers like Chrome or Firefox. And sometimes, even when a Linux app exists, some prefer the speed and simplicity of a browser add-on.
So, here’s how to set up a VPN on Linux using a browser extension:
- Choose a VPN provider and create your account. For example, VeePN, a top-rated VPN provider, offers extensions for browsers like Chrome, Edge, and Firefox and lets you connect to 89 locations globally.
- Install the official VeePN extension of your choice.
- Log in with your username and password.
- Select your desired VPN location.
- Activate the VPN in your browser whenever you need it.

How to set up a VPN on Linux: A detailed guide (Command Line)
Now, if you want to route all your internet traffic through the VPN and ensure comprehensive data protection, you’ll need to use Network Manager on Linux. With VeePN, this option works on Linux distributions like Ubuntu, Debian, Fedora, CentOS, and Arch.
Here’s how to set up a VPN on Linux Ubuntu, but the process is quite similar across all Linux distributions:
- Make sure you have a valid VeePN account with an active subscription. If not, select a suitable plan, all backed up by a money-back guarantee for your peace of mind.
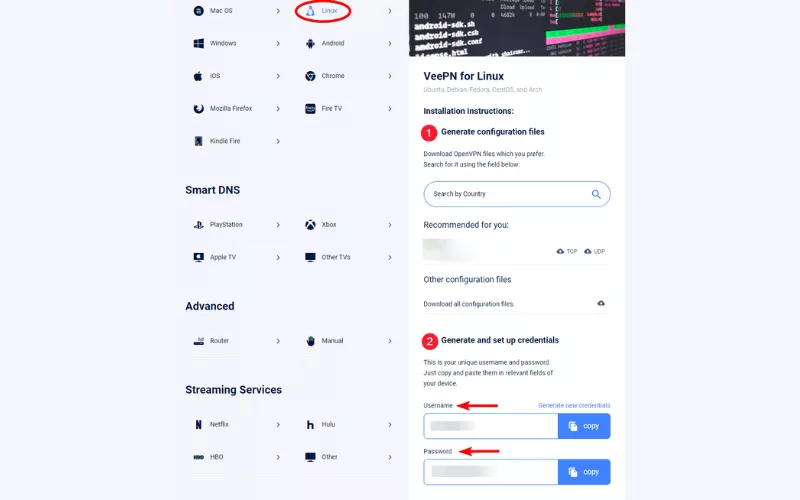
- Log in to your VeePN account and choose Linux under Set up new devices.
- Find the “Generate configuration file” section, choose your preferred location, and download the configuration file.
- Generate your username and password below the configuration file section.
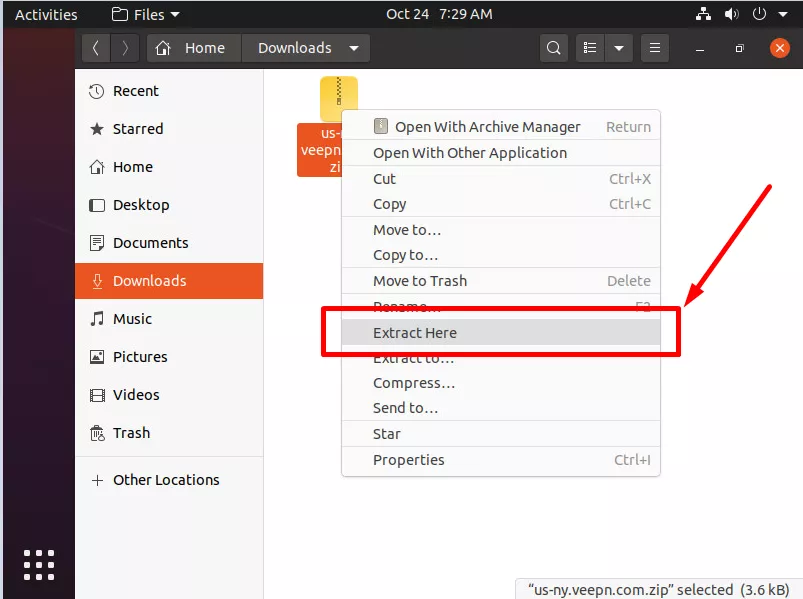
- Extract the downloaded zipped archive.
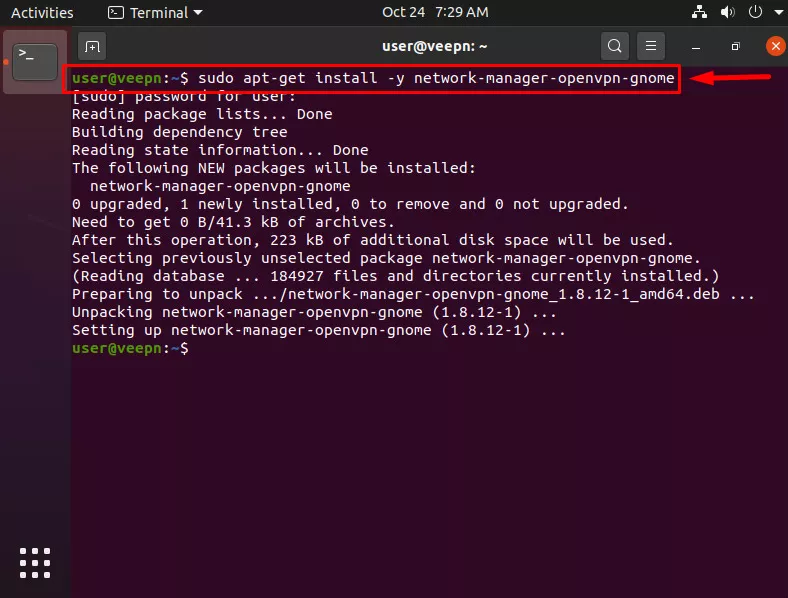
- Open your Terminal and install OpenVPN Network Manager on Ubuntu using the following command: sudo apt-get install -y network-manager-openvpn-gnome
- Access Network Settings from the System menu.
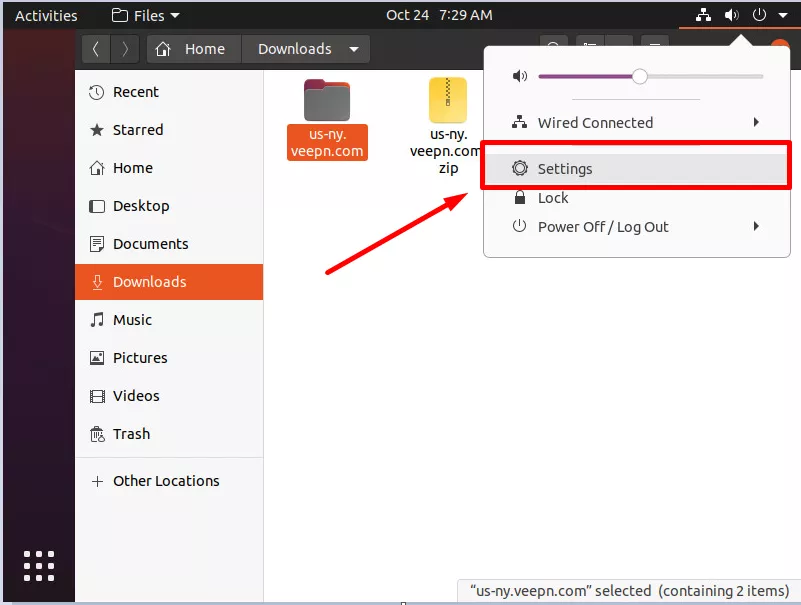
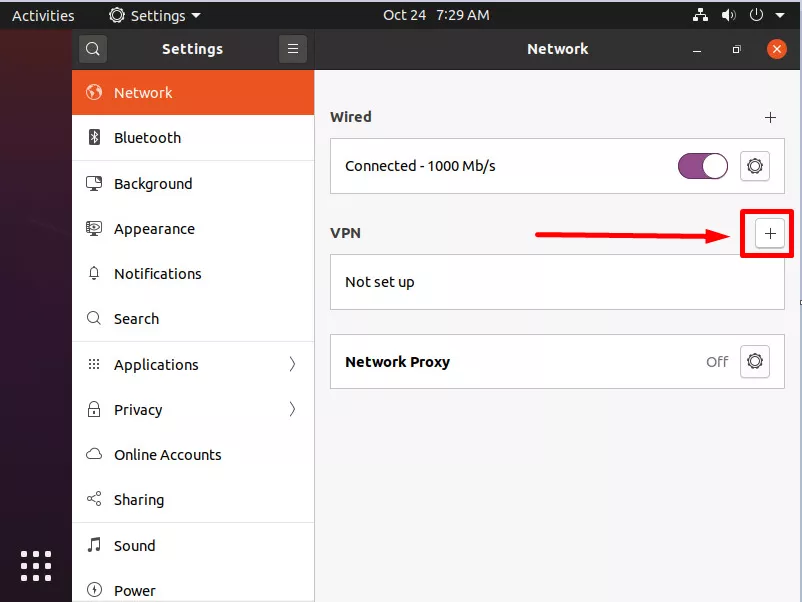
- Within Network Settings, click on the “+” button located in the VPN section.
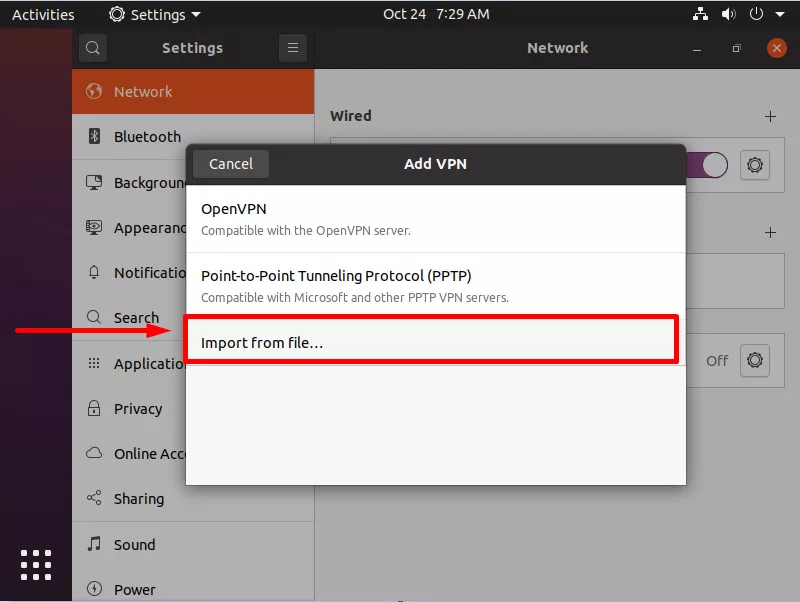
- Select Import from file…
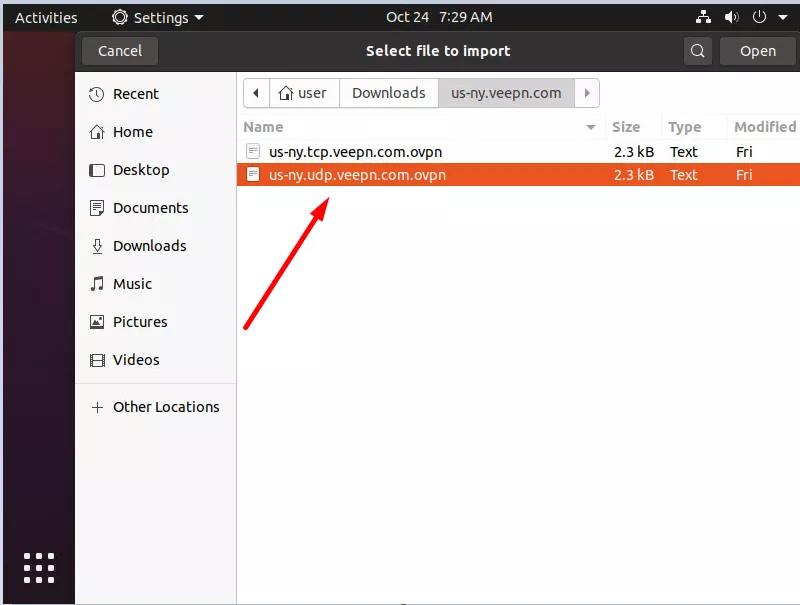
- Locate and choose the OpenVPN configuration file you downloaded in Step 1, then press Open.
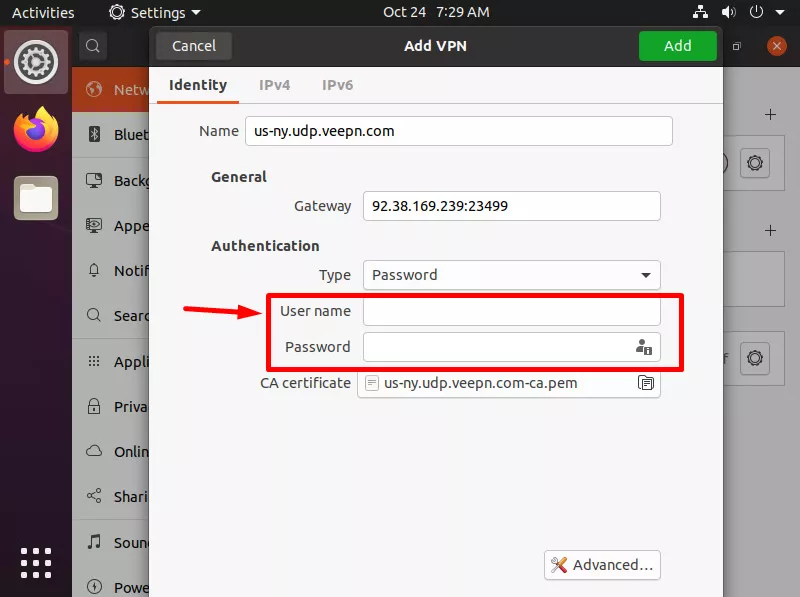
- Provide the username and password generated in Step 2, and click Add. Close the Settings window.
- Revisit the System menu, click on the VPN and Connect submenu.
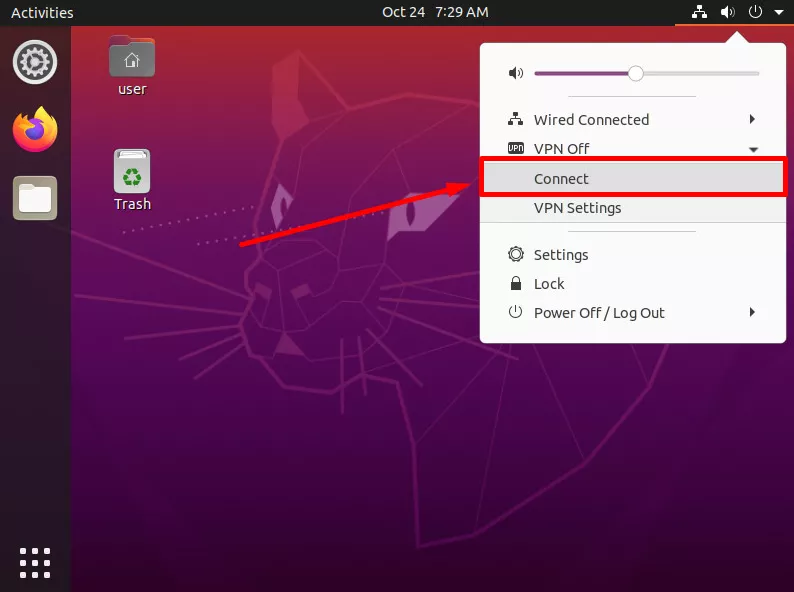
- You are now connected, and a VPN icon will appear in the system tray to indicate your connection status.
Setting up a VPN on your router (For all Linux devices)
Lastly, consider setting up a VPN client on your router that uses OpenVPN VPN protocol. Although more time-consuming, this option offers the advantage of routing all network traffic through the VPN, ensuring protection for every device, regardless of the operating system.
Here’s a step-by-step guide for Linux VPN setup on your router:
- Check router compatibility. Verify if your router supports VPN. You can find this information in the router’s manual or by searching online. Some VPN-friendly router examples include AsusWRT, TP-Link, Tomato, DD-WRT, Edge Router, and others.
- Access router settings. Open your router’s settings by typing its IP address into a web browser’s address bar.
- Log in. Log in to your router’s settings using the administrator username and password. If you haven’t changed these, you can find them in your router’s manual or on a label on the router itself.
- Find the VPN section. Locate the VPN section or tab in your router settings. Its name may vary depending on your router’s brand.
- Configure VPN settings. Obtain the appropriate files for your VPN location from your VeePN account’s Configuration Files. After downloading them, extract the files.
- Set up your credentials. Generate your username and password.
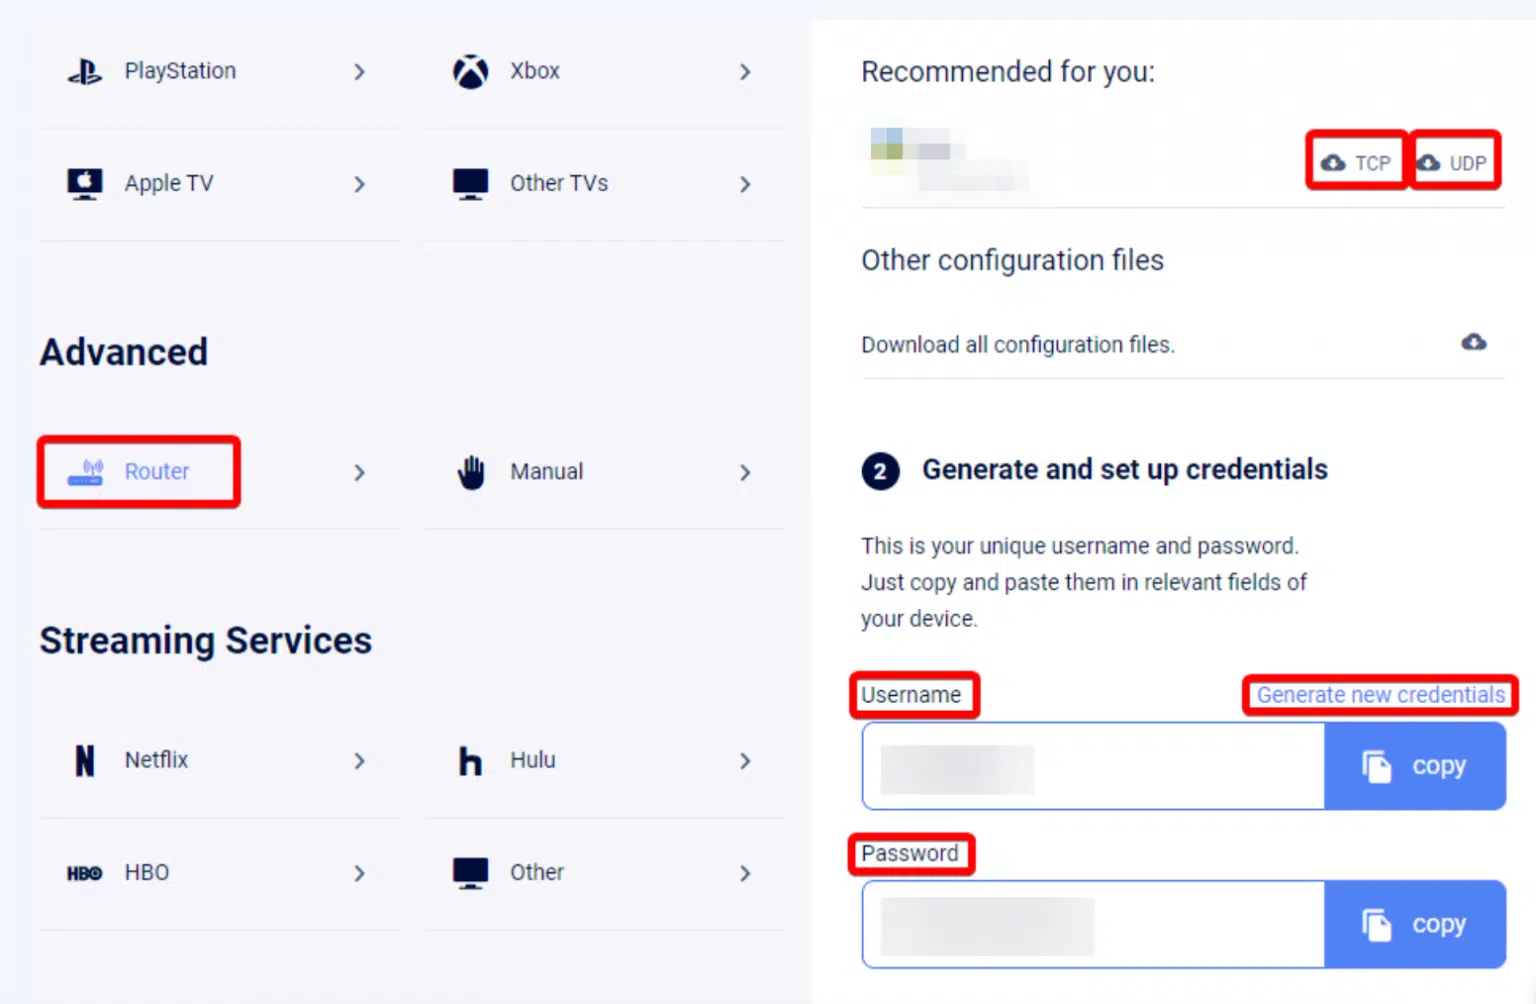
- Import a VPN configuration file into your router’s settings and enter your username and password.
- Save your changes and activate the VPN on your router.
- Restart your router. To apply the changes, give your router a reboot.
- Connect devices. Now that the VPN is set up on your router, every device connected to your local network, including those running Linux, will be automatically protected by the VPN. You don’t need to configure the VPN on each device individually.
- Test your VPN connection. Ensure everything is working smoothly by verifying that your IP address is hidden, and your online activities remain secure.
And there’s that! All devices connected to your home network are now protected by a VPN.
Note:VPN not connecting? Check out these troubleshooting steps.
With your VPN now set up on Linux, let’s explore the benefits it brings.
Why set up a VPN on Linux? Key benefits
The need for a VPN is consistent across all operating systems, including Linux, Windows, and Android, for several crucial reasons:
- Enhanced security with VPN encryption. It ensures your online activities remain confidential, shielding them from third parties, like government, hackers, or advertisers. Besides, a VPN protects all your Internet traffic, safeguarding your sensitive information from potential threats like man-in-the-middle attacks and hacking attempts.
- Improved privacy. Sometimes, you simply want to be anonymous online to a certain extent. We’ve all heard stories about websites like Facebook getting a little too cozy with our data for advertising purposes. And guess what? Some Internet Service Providers (ISPs) are guilty of selling your data, too. That’s where VPN encryption and a new IP address come in handy.
- Avoid online censorship. In some countries, certain websites and services are blocked. A VPN can help you access these restricted sites, even in countries that attempt to block VPNs themselves.
- Unlock the world of content. With a VPN, you can basically teleport your Internet connection to any location you want and keep access to your favorite content worldwide.
- Snag extra perks. Changing your virtual location can score you some extra goodies. Some websites offer special deals or discounts depending on your IP address. So, by signing up with a different IP through your VPN, you might just grab a better sign-up bonus or snag better rates.
- More security and privacy. Leading VPN services like VeePN offer additional security and privacy features like NetGuard, Kill Switch, and Double VPN for extra protection.
VeePN offers versatile data protection, supporting up to 10 devices with a single account. You can use it as a browser extension, a native app for Android or iPhone, or configure it on your router. The choice is yours!
FAQ: How to Set Up VPN on Linux
The easiest way is to install a native VPN application for Linux. If your VPN provider doesn’t have one, you’ll need to add OpenVPN configuration in the Network Manager. Learn how in this blog post.
Configuring a VPN on Linux involves:
- Accessing your Linux system’s network settings.
- Adding a new VPN connection.
- Providing the VPN server details (address, authentication, etc.) as provided by your VPN provider.
- Saving the configuration.
- You can then connect to the configured VPN from your network settings whenever needed.
Find out more in this article.
Setting up a VPN on Linux is entirely secure, if you have done it the right way. Check this article to learn how to set up VPN for Linux properly.
To troubleshoot VPN connection issues on Linux, check your internet connection first and ensure your VPN client is installed and configured correctly. Verify that the VPN server details (e.g., address, port, and protocol) match your provider’s settings, and use logs from journalctl or the VPN client for debugging. If the problem persists, try restarting the network service or updating your VPN software.
VeePN is freedom
Download VeePN Client for All Platforms
Enjoy a smooth VPN experience anywhere, anytime. No matter the device you have — phone or laptop, tablet or router — VeePN’s next-gen data protection and ultra-fast speeds will cover all of them.
Download for PC Download for Mac IOS and Android App
Want secure browsing while reading this?
See the difference for yourself - Try VeePN PRO for 3-days for $1, no risk, no pressure.
Start My $1 TrialThen VeePN PRO 1-year plan


